PREFACE: This post is part of the Zero to Hero series.
Making your way through Salesforce workbooks and tutorials are nice but I personally had a hard time relating to the exercise because it wasn’t my company and what I was building was not something that I could use in my everyday life.
That is why together, we are going to build a household management app in Salesforce!
If you are new to the concept of building an app, be sure to read the posts leading up to this on. They will cover important basics of Salesforce that are important to know before jumping in.
Also, be sure that you’ve created your free developer org. This is where you’ll be building this app.
This workshop will take place over the course of a few posts in order to keep this manageable.
What We’re Building
Almost everyone has a vehicle, but we don’t often know when the last oil change was or the name of the part they replaced a few months ago. So, I thought that it would be interesting to use Salesforce to track auto repairs and lifetime repair costs. I created this app and have been using this app in a developer org for about a year now and it has been a great way to keep track of my repair bills and total cost of ownership of our vehicles.
This is what we are going to build today as the first part of our family management application. Here is the overview of what we’re creating.
- Create and customize the Account object to track repair shops
- Create a new custom object to track vehicle details
- Create a new custom object to track repairs on vehicles
Here is a visual of what we’re building.

The schema builder allows you to get a visual of your objects and even allows for the creation of objects fields. However, today we will be using the standard process of creating these data points.
Today, we are going to focus on modifying the standard Account object with a new page layout and record type and some custom fields. Over the next few posts, we’ll build the remainder of the custom objects and fields and even customize Salesforce1 for mobile use!
Understanding Record Types & Page Layouts
Record types allow you to segment a particular object for specific uses. So, since I’m a visual learner, I created the below image to help us understand this concept a little better.
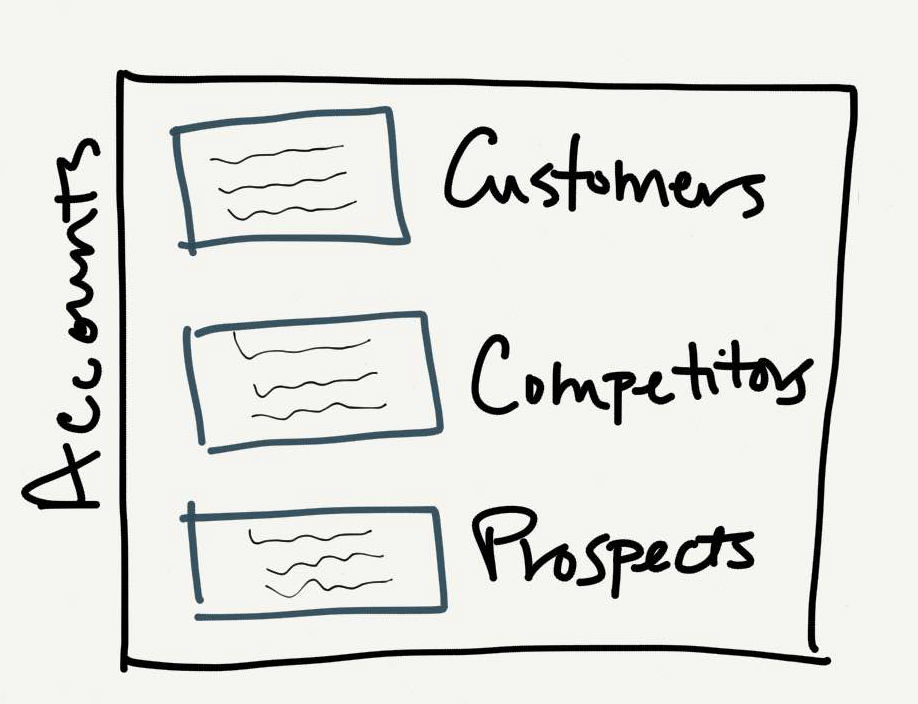
Think of the account object as a large packing box. Within this box, we can place and organize smaller boxes which contain records that are similar, but different. In the above image, the Account is the object and represents the larger box.
Within that box of Accounts, record types allow us to break down the different types of accounts such as customers, competitors, and prospects. The types of data we’ll work with on these records will be similar, but record types also allow us to modify page layouts with fields and field values which may vary between each type.
In the family management app we are going to build, Accounts will be the basis for several types of records. For example, they will contain information related to repair shops and doctors offices.
Since the information we will collect on these types is so vastly different, we’ll customize the record types and page layouts so that when we are looking at a repair shop record, we don’t see fields related to the doctors office and vice versa.
If you are still confused about record types and page layouts or you want to a more in-depth training, check out this video by my friend Shell Black.
Modify the Account Object
First, let’s focus on modifying the account object. For our purposes, we’ll be using the account object to track the repair shops. Because the account object can track multiple other types of data (like a doctors office location), we first need to create a record type.
Create a Page Layout
Page layouts and record types work together. A page layout is the visual representation of a record type. Page layouts contain fields, arrangements and properties such as if a field is required or read-only.
We’ll create a page layout first then after creating the record type, we’ll match these two together.
- Click Setup | Customize | Accounts | Page Layouts
- Click New to create a new page layout.
- Choose an existing page layout if there is one that you want to copy values from. For our purposes, we’ll leave this picklist blank.
- In the Page Layout Name field, enter Repair Facility into the box.
- Click Save.
- Next, we are going to add some standard fields to the page layout we’ve just created. Using the layout editor, add the following fields. If you need help, see the gif image below or download the instructional guide with screenshots below.
- Phone, Billing Address, Shipping Address, Description, Created By, Last Modified By
- On the page layout editor, click Save. Since we haven’t created any fields, there is nothing to arrange on the layout editor but we’ll be back to arrange this page soon enough.
Here’s a demo showing how to use the drag and drop page layout editor.

How was that? It’s a pretty quick process. Now that this is completed, let’s create the record type!
Create a Record Type
Salesforce doesn’t come standard with any record types. Let’s create our first one.
- Click Setup | Customize | Accounts | Record Types
- Click New to create a new record type.
- Choose a master record if you want to duplicate the values of a similar record type, otherwise, this can be left blank.
- Give the record type field a name by filling in the Record Type Label field. For this record type enter Repair Facility.
- Hit “Tab” on your keyboard or click into the Description field to fill the Record Type Name field. This is the Salesforce API name which will be referenced in formulas and via the API.
- In the Description field, enter Used to track car repair facilities.
- Check the box Active to ensure that the record type is accessible to users.
- At the bottom of the page, check the boxes for each profile that should have access to this record type.
- Click Next.
- This next page is where we’ll assign the page layout to the newly created record type. Leave the default selection of Apply one layout to all profiles and select the newly created profile from the picklist of available page layouts.
- Scroll to the bottom of the page and click Save.
Get excited folks – you did it!
It’s time for a little happy dance!
Best Practices
Now the Account record is setup and ready for us to enter data. That’s all we are going to cover today but before we go, here are some best practices and helpful tips when it comes to working with record types and page layouts.
- Before building anything in Salesforce, think about the impact to reporting. How does the business want to see the data? This will impact your configuration.
- Depending on the business requirements, you may not need to use record types for certain functionality. Occasionally, a single-select picklist will work just as well as a record type (again, think about reporting).
- Make it easy on yourself; for every record type, create a matching page layout.
- Arrange fields into sections.
- Try to arrange the fields in a logical order. This is where you’ll want user feedback for sure. Sometimes, users want the most important (or required) fields towards the top. Do whatever works for your business but make sure it’s arranged logically.
What’s Next
If you have any suggestions, comments or questions, please post them below. Don’t forget that we have a Chatter group on the Success Community which is a great place to ask questions as well. Click here to join the AdminHero.com Chatter group.
We’ll be focusing on building the rest of this app over the next few Zero to Hero posts to stay tuned!

Leave a comment