PREFACE: This post is part of the Zero to Hero series.
Salesforce terminology can sometimes be confusing (or seem confusing at the very least). This is especially true when you’re new to the platform. Today’ we are going to focus our efforts on understanding objects in Salesforce; specifically custom objects.
At the same time, we will also be continuing to build our family management application in your developer orgs. If you haven’t read the previous Zero to Hero post, be sure to catch up on that first by clicking here.
Standard vs Custom Object
In the very first Zero to Hero post titled Understanding Salesforce as a Database, we looked at the basics of database design and how Salesforce fits into that. If you remember, we talked about tables, columns and rows.
Salesforce database tables are called Objects. There are two different types of objects in Salesforce – standard and custom. You’ve probably heard these terms and though to yourself “what’s the difference between these two objects?”
When you unwrap any brand new Salesforce org (like your developer org for example), you’ll notice that there is some functionality already set up ready for use. This includes standard objects like Accounts, Contacts and Cases.
What Salesforce doesn’t have out of the box is functionality that suits your business need. This is where custom objects come into play. You can build your own custom objects to satisfy specific business needs.
Custom objects contain all of the same components as standard objects. The only difference is that Salesforce has provided some objects for you (standard objects) and has given you the ability to build your own objects (custom objects) as needed by the business.
Creating a Custom Object
Let’s take a quick moment to review what it is that we are building in our developer orgs.

Part of the family management app we’re building includes an area to track automotive repairs and related expenses. Last time we customized the Account standard object by creating a page layout and record type to capture details about the repair shop.
Today, we are going to create our very own custom object. Two of them actually. One to track the details of your vehicle and one to track the details of the related repair.
Creating a Custom Object
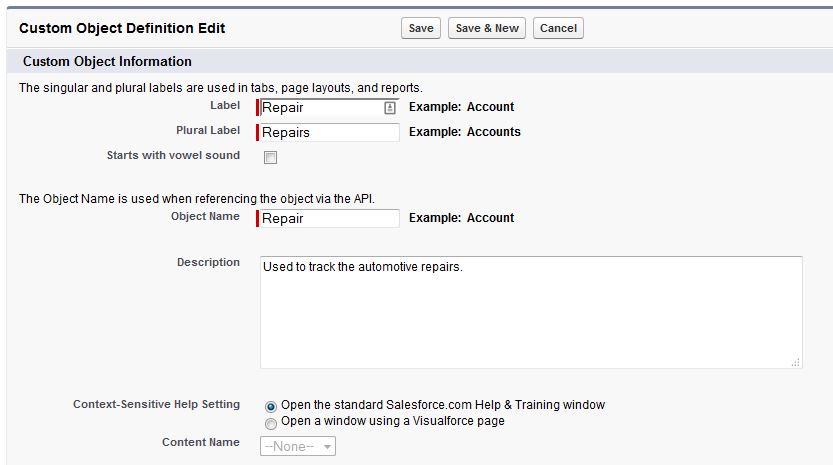
Creating a custom object is quite easy. So, let’s walk through the steps to create our first object called Repairs.
- After logging into your Salesforce developer org, click Setup | Create | Objects.
- At the top of the page, click New Custom Object to open the wizard.
- In the Label field, enter the singular version of the object name which in our case will be Repair.
- In the Plural Label field, enter the plural version of the object name which in our case will be Repairs.
- Enter a short description of this object (like what it will be used for) in the Description field. This is a best practice so make sure to get into the habit of providing a description for everything you create.
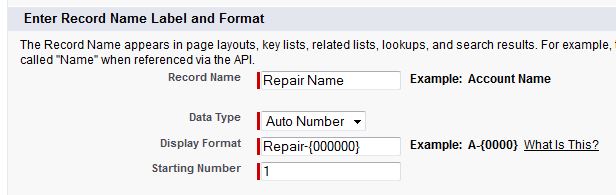
- In the Enter Record Name Label and Format section, we’re going to make a few changes to allow for an auto number as the name.
- In the Data Type field, choose Auto Number
- In the Display Format field, enter Repair-{000000}
- In the Starting Number field, enter 1
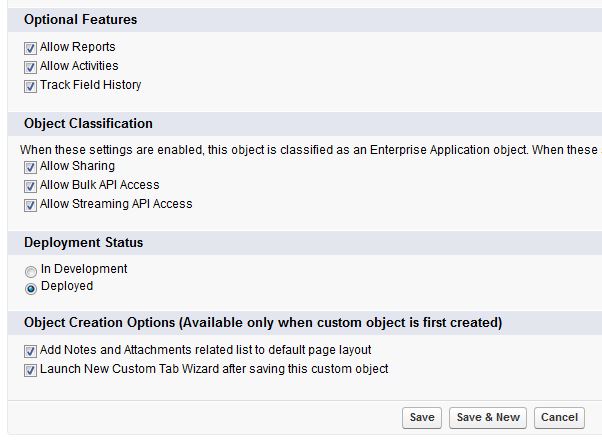
- In the Optional Features section, check the boxes for Allow Reports, Allow Activities and Track Field History.
- In the Object Classification section, confirm that all boxes are checked.
- In the Object Creation Options section, check both boxes (Add Notes and Attachments related list to default page layout and Launch New Custom Tab Wizard after saving this custom object).
Great! Before we hit save, let’s do a quick review of what we just did and why.
Custom Object Label and Plural Label
When creating a custom object, Salesforce asks for the singular and plural version of what you want the object to be called. The reason for this is so that the language used on buttons and other areas of Salesforce are grammatically correct. For example, if we entered Repairs as the value for the field Label, the button we would use to create the repair on the Account object would read New Repairs instead of New Repair. Since we are technically creating one new repair record at a time, the word Repairs is incorrect.
Auto Number vs Text Name Field
Auto Numbers replace the text name field of a record. Instead of having to fill in every name field for every repair, Salesforce will generate a unique number for every record. This is a great option for this type of record because the name would more than likely be the same for every repair. Using a unique number reduces the number of fields to fill out and provides us a reference number which can be searched and reported on in Salesforce.
The Display Format field allows us to customize how the auto number displays. Here’s a breakdown of the name as it is formatted here.

Optional Features
The remainder of the custom object creation page are permissions and properties of the object. Here is what each one does.
- Allow Reports – checking this box allows the object to be accessible in Salesforce reports. This box should always be checked. I can’t think of a reason why this box would not be checked.
- Allow Activities – when this box is checked, users will have the ability to create tasks and events on the record. I prefer to check this box in the beginning. If the business decides we don’t need to have activities on the object, it can always be removed.
- Track Field History – enables the ability to track changes in specific field values. This is important for records where an “audit trail” of changes are needed. Activating field history tracking also allows you to generate a report on these changes.
- Add Notes & Attachments related list – checking this box allows users to create notes and upload attachments to the record. Again, I tend to activate this in the beginning and remove it later if needed.
- Launch New Custom Tab Wizard – this option is only available when creating a new custom object. An object must be associated with a tab in order to be listed on the tab ribbon at the top of the page or to be accessible as a stand-alone object. There are instances when you may not want to create a custom tab, like if you want to force users to access the data only through a related record or if you have tab limits (Enterprise Edition and lower).
Great! Now that we have gone through the creation process and reviewed all of our options, let’s complete the creation of this object. We’ll click Save at the bottom of the page to save our object settings and launch the custom tab wizard.
On the New Custom Tab wizard page, click the magnifying glass icon next to the Tab Style field. This will allow you to select an icon and color scheme for the new tab. For the Repairs object, let’s choose the Wrench. Once selected, click Save to complete the tab setup.
Now that the repairs custom object is created, we need to repeat that process to create a second custom object to track automobiles. Go through the same process as above, but use the following settings to create this object.
- Object Name – Use Automobile as the object name. Don’t forget to indicate the plural of the object name in the appropriate field.
- Record Name – Leave this as text instead of Auto Number. This will allow us to enter the specific name of the vehicle.
- Tab Style – when selecting a tab style from the Custom Tab Wizard, choose Keys.
Viewing Our Custom Objects
Now that the objects are created, we can now manage these objects just like any other object in Salesforce. It’s important to note that accessing a custom object is different than accessing a standard object.
Custom objects are always going to be found in the Objects section of Salesforce under the Create menu within Setup whereas standard objects will be listed under the Customize menu.
If we look at our newly created custom objects, you’ll notice that there isn’t a whole lot there.
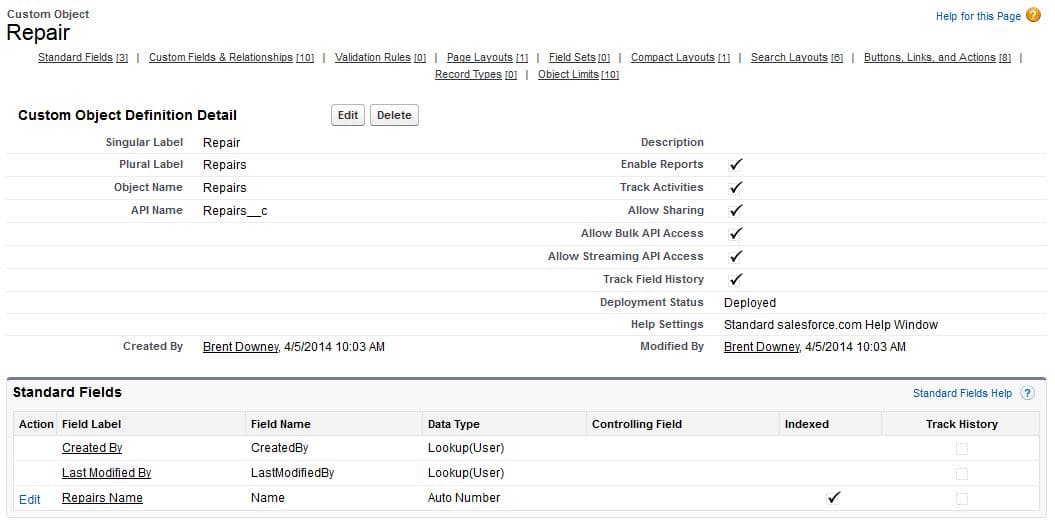
The settings at the top of the page were set by us, and Salesforce has automatically created three fields, Created By, Last Modified By and the name field. Creating the custom object means that we’ve assembled the box, but there is nothing in that box quite yet.
It’s also important to note that this object is not related to any other object. It’s an island right now. To make this object useful, we need to create custom fields to track data related to repairs and automobiles and build some relationships to other objects in order to create meaningful data.
In the next post, we’ll cover the basics of fields, field types, and relationships and we’ll finish the configuration of this section of our family management application!
Congratulations!
You’ve completed yet another lesson in the Zero to Hero series! How are things going? What questions or comments do you have? Post a comment below or email me at brent@adminhero.com. I would love to hear how Zero to Hero is helping you learn Salesforce (and where you are still stuck).

Custom objects make SF a powerhouse in terms of flexibility, data modeling and app customization.
Another great post Brent! Thanks!
LikeLike
Thank you Jose!
LikeLike
Hey Brent! I just want to say that you do a tremendously awesome job explaining Salesforce. There’s a lot of great info out there but you consolidate the important stuff in easy to understand/learn ways. I have an up and coming admin I am training and I am pointing her to trailhead but also to your blog. It’s one thing to learn from Salesforce and another to learn from someone with everyday experience. Keep up the awesome posts! 🙂
LikeLike
Thank you so much Lauren!
LikeLike
You are a genius Brent. You are truly my Admin Hero.I really look up to you and David Liu as my inspiration to learn Salesforce.
LikeLike
Thank you Salesforceaddict!
LikeLike
Hi Brent,
I am a regular follower of your blogs specially Zero to Hero series.
Zero to Hero is really helping me to learn Salesforce.
I am planning to give ADM201 certification exam in next few months.
Could you please let me know if your topics in Zero to Hero series will be enough to seat for the exam.
LikeLike
Hi Salesforce Novice! The topics in Zero to Hero are fundamental. While they will help you to some degree, I would not rely on the content exclusively for the certification exam. The Admin Certification covers a very broad range of topics, some of which I haven’t covered at all on Admin Hero. Use multiple sources to study including Salesforce Help & Training. When in doubt, Help & Training is the most accurate source of information as well so, rely exclusively on that information for accuracy. Good luck to you!
LikeLike
Hi Brent,
Awesome work so far. I am eagerly waiting for remaining posts. Also i wanted to suggest if we can have more examples around different relationships, that would help us understand even better. Junction object concept still bugs me …:)
Now that you are already doing research & putting down these posts, will it be feasible to provide some reference material for each post, just towards the end of the post. I know there is a section for references, but just like Q&A page after each chapter this could be a good change.
Thanks for all the work !!!
LikeLike
These are excellent suggestions Praveen. I will be talking about custom fields and relationships in the next post and I would be more than happy to include an additional reading section on each of these posts. I’ll go back and update the older posts as well to include this information. Thanks for reading!
LikeLike
This is a great article!
I’ve created a custom object, but for some reason my users can’t create new records on that object. I have gone to their profiles and enable “edit read and write” but it’s still not working?
Do you have a solution for this by any chance?
LikeLike
Make sure that the object is available in their selected app. Also, be sure that the tab is on and not hidden. This can be verified in the profile settings. Let me know if that works for you or not.
LikeLike
Brent– Thanks again! I’m enjoying the ride! Lisa
“Now that the repairs custom object is created, we need to do repeat that process” I don’t think you need the word “do” in this sentence.
LikeLike
I was struggling to understand some of these concepts. Your direction and explanations have made me bring a lot of concepts all together. Please keep giving us more material to learn.Thanks!
LikeLike
That’s awesome, Eliot! I’m so glad that helped!
LikeLike
Nice information, Thanks for sharing such article, keep posting
Are you looking for best Salesforce course in Hyderabad
LikeLike