PREFACE: This post is part of the Zero to Hero series.
Automation is where Salesforce shines. The ability for fields to update, automatically send an email, and tasks assigned based on specific logic.
While workflows are used in many organizations, Approval Processes don’t get used quite as much. Perhaps they seem too formal, or too rigid, but approval processes increase the value of Salesforce by ensuring that there are checks and balances on the most vital records in Salesforce.
What is an Approval Process?
An approval process is an automated way of submitting a record for approval. An approval process is made up of several elements:
- Record entry criteria
- Automated routing and record edit settings
- Notification settings
- Indicating who can submit a record
- Approval steps
- Final Approval and Final Rejection steps
There isn’t a whole lot to an approval process. Where many people get confused or frustrated is when the business doesn’t provide a well-defined approval process. Approval processes don’t provide much flexibility, so ambiguous or poorly defined processes either won’t work, or will need to be rehashed, so it is well defined.
Defining the Process
Before configuring any element of the approval process in Salesforce, sit down with stakeholders and ask questions. You’re looking for very specific details on the process. Some of the questions you may want to ask fall in tandem with each of the main elements defined above:
- Who should be able to submit a record for approval?
- Under what circumstances should the record be submitted?
- What fields of the record should be filled out and what would their specific values be?
- Who should be able to edit or unlock the record when it’s in the approval queue?
- How should the approvers be notified? If by email, what type of information should be included in the email template? If by Chatter, what fields should be displayed in the Chatter post?
- Who all needs to be involved in the approval process?
- How many approval steps are there and what are the thresholds or specific criteria under which an approver would be notified that approval is needed?
- If there is more than one approver in any particular step, does the approval need to be unanimous or can anyone approver in that step approver the record and allow it to proceed through the process?
- How should the record submitter be notified of approval or rejection on the record and what would the specific text include in the response?
- Are there additional elements of the process that we can automate based on an approval or rejection of the record?
The idea is to capture the entire process from start to finish and ask specific questions as it relates to the approval process. Again, remember that the approval process itself is not terribly flexible so the answers to the above questions will go a long way in determining how to configure the process.
With the business process documented in your notes, it may be helpful to use a tool like Lucid Charts or Visio to map out the process and each of the process steps. Provide the chart and other notes to the stakeholders to confirm.
Considerations
The last thing to discuss are the considerations, courtesy of Salesforce Help & Training. Keeping this information in mind is good. For more details and additional considerations, see the Considerations for Approval Processes article.
- There can only be one active approval process per object, and active approval processes can’t be deleted. Deleting an active approval process requires making it inactive, and removing any records that have been submitted and are awaiting review.
- Email approval responses can be enabled, which allows approvers to reply to an email notification with the word “Approve” or “Reject,” but the user must have the API Enabled system permission awarded.
- Educate your users on the entry criteria. There is nothing on the page layout that indicates what the criteria should be, and the error message that displays to users if the criteria aren’t met is a standard Salesforce error message.
- Records are locked to users once submitted for approval which means that the submitting user (the owner for example) won’t be able to edit the record detail until the record is approved or rejected. Optionally, the record can be manually unlocked by a System Admin, approving user, or any user with the Modify All object-level permission or Modify All Data user permission.
- Flows can delete records that are in an approval process.
- An approval process can specify a field update action that re-evaluates workflow rules for the updated object. If, however, the re-evaluated workflow rules include a cross-object field update, those cross-object field updates will be ignored.
- Field updates that are executed as approval actions don’t trigger workflow rules.
- There is a limit of 30 steps.
- There is a limit of 25 approvers per step.
- After an approval process is activated, you can’t add, delete, or change the order of the steps or change reject or skip behavior for the process, even if you make the process inactive.
Part 1 – Building the Approval Process
Creating an approval process is quite straight forward. Salesforce offers a wizard type UI, which walks you through every step and setting. To begin, click Setup | Create | Workflow & Approvals | Approval Processes.
In the Manage Approval Processes For section, use the picklist to choose the object the approval process will be created for. For today’s example, I’ll be creating an approval process for the Opportunity.
Next, click on the Create New Approval Process button and select Use Standard Setup Wizard.
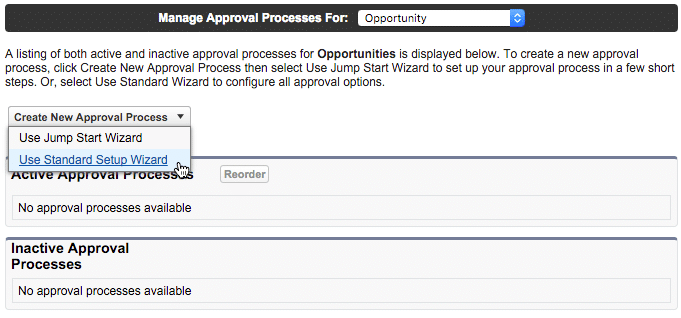
When creating a new approval process, I prefer to use the Standard Setup Wizard because it will walk me through every step of the process. It ensures that I don’t miss anything on initial setup. Clicking Use Jumpstart Wizard will provide the Admin with an abbreviated wizard guide, and then it’s up to you to click into the rest of the approval steps and settings and make the appropriate updates.
Now that we’ve invoked the setup wizard, let’s get started!
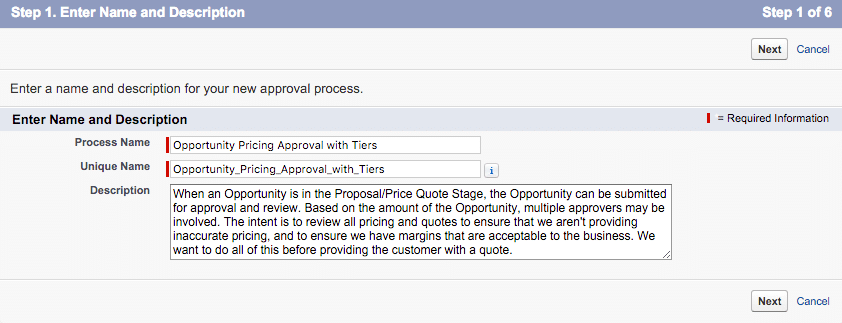
Step 1: Enter Name and Description
Standard Salesforce best practices come into play here. Provide a name for the approval process that meets the character count limits, but is descriptive enough not to need a description. Then, even though your name is stellar and doesn’t need a description, enter a description anyhow!
I like to write down what the goal or outcome of the process should be in clear terms. That way, anyone that comes after me can understand what the approval process should be doing and troubleshoot as necessary.
Step 2: Record Entry Criteria
Now it’s time to indicate under what circumstances a record can be submitted for review. The concept behind record entry criteria is ensuring that all of the proper information has been captured, and the record has everything provided that an approver will need to Approve or Reject the record.
Thankfully, this step is familiar if you’ve used Workflow Rule filters. If the criteria is a bit more complex than what can be created using picklists, a formula can be created instead.
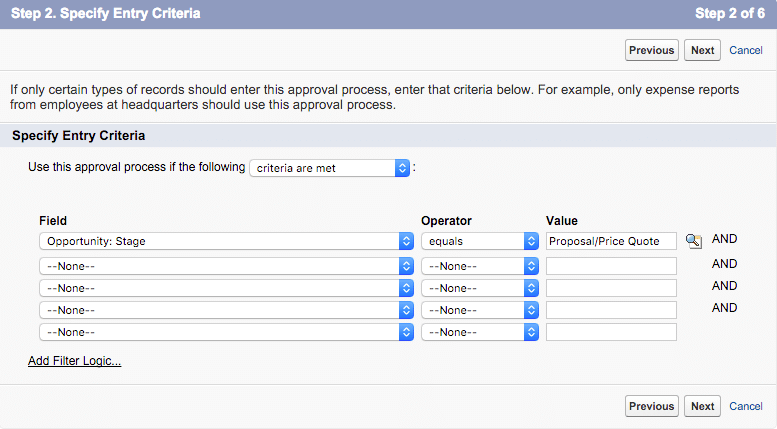
Notice that I can add multiple filters and apply filter logic to those filters. Keep in mind that additional fields may need to be created to accommodate the approval process. In this example, the only entry criteria are that the Opportunity Stage is equal to Proposal/Price Quote.
Step 3: Approvers & Record Edit Settings
This step can be a little confusing (at least it was for me when I created my first approval process). In this step, Salesforce wants to know if there are any other users related to the Opportunity that should be referenced in the approval steps (which we’ll build in one of the next steps). Use the provided picklist to select a specified user.
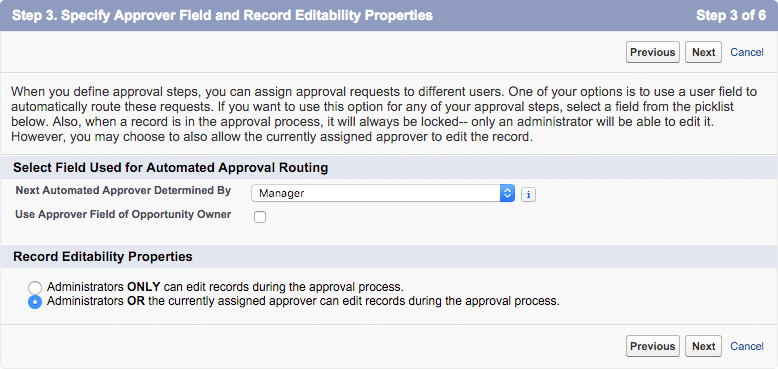
In this example, when the Opportunity is submitted for review, I want the manager to be the first automated approver. The submitting user’s manager should always review the Opportunity record and approve. By selecting Manager from the picklist above, we’re indicating that the Manager, as indicated on the user record, will be used.
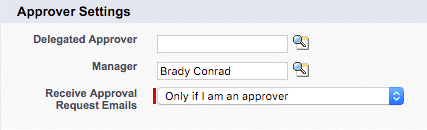
Another important field to note on the user record is Delegated Approver. A Delegated Approver is someone who can approve records on behalf of the assigned approver. Delegated approvers come in handy when the assigned approver is out sick, or on vacation; preventing records from getting stuck in a queue.
The second part of Step 3 is to indicate who can unlock or edit a record while the record is waiting for approval. The two options are Administrators Only, or Administrators and Assigned Approver. Again, based on your business process, make the appropriate selection. In my example, I want the assigned Approver to be able to edit the record if needed.
Step 4: Notification Templates
Next are notification settings. In this step, we’re identifying two templates: an email and a Chatter post. Both or either of these notifications are sent to the assigned approver(s) when the record is submitted. If an email template doesn’t already exist, these settings can be updated later, or a template can be created now.
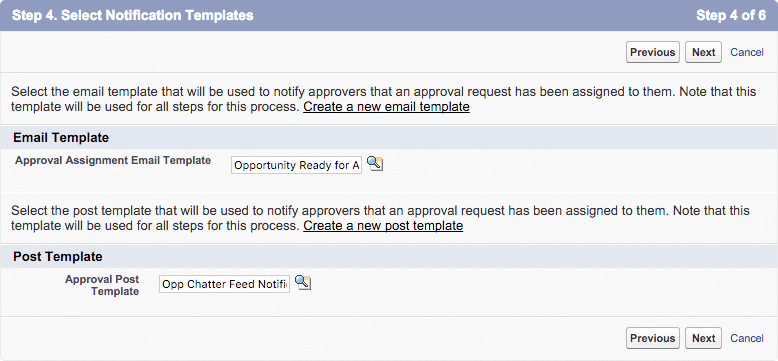
For email or Chatter templates, be sure that there is an appropriate subject and enough information in the body of the email to provide context to the approver. Leverage standard email template functionality such as HTML formatting of text and merge fields to pull in record details.
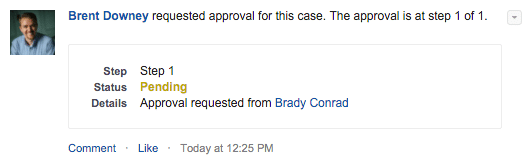
Chatter approvals are not enabled by default. If this functionality should be enabled, click Setup | Customize | Chatter | Chatter Settings and click Allow Approvals. Once enabled submitting users will see the above screenshot, and approvers will see the fields as defined in the Approval Post Template with an Approve and Reject button.
For more information on creating Approval Post Templates, click here.
Step 5: Approval Page Layout
Step five is the configuration of the approval page. When the assigned or delegated approver has completed the review of the record and related information per the business process, they’ll click into the record to either Approve or Reject the record and provide comments. This step is the configuration of what will be shown to the approver while they’re updating the record.
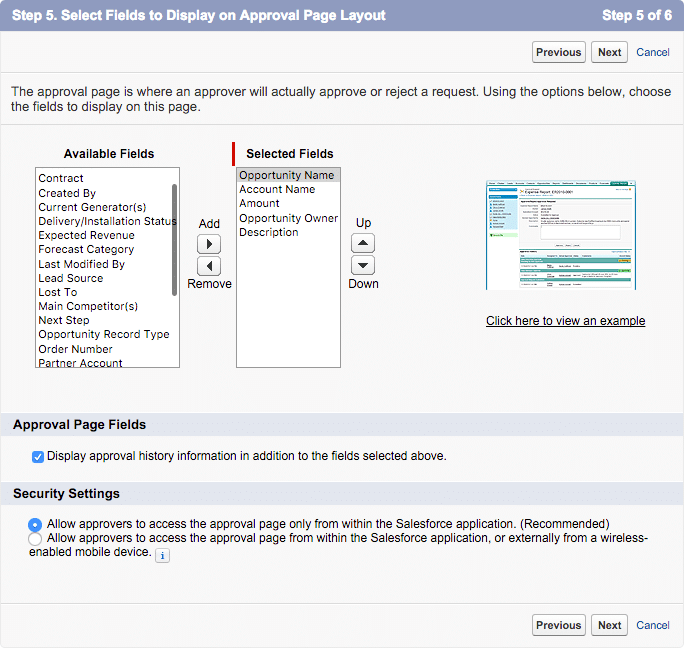
For my example, I’ve added a few important Opportunity fields which will provide some context for the approver. I’ve also checked the box to allow the approval history to be a part of the approval page layout. Adding the approval history to the page layout can be helpful when there is the potential for the record to be submitted for approval multiple times.
Last is the Security Settings section. I’ve always left this section as-is with the recommended settings.
Step 6: Initial Submitters
Records can only be submitted for approval by the users specified in the approval process. Step six specifies who specifically can submit a particular record for approval. The record owner is typically the one with permissions to submit the record, but depending on the use case and business process, specific users, roles or groups can submit records. I’ve selected the Opportunity Owner as the only initial submitter.
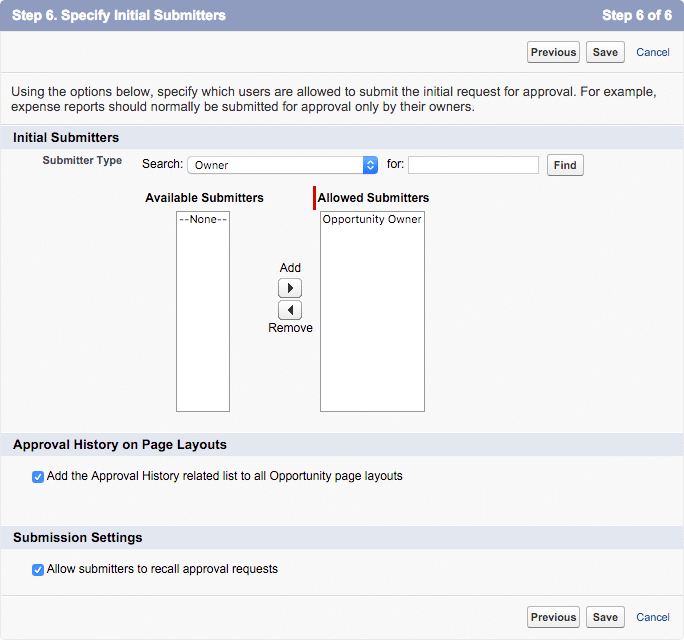
Two checkboxes indicate additional settings. It’s a good idea to enable the Approval History on Page Layouts feature. When checked, this option will add a new related list to the record called Approval History and users can see when the record was submitted, what step it’s in waiting for approval, who approved or rejected, when, and any comments provided by the approver.
By checking the box in Submission Settings, submitters have the ability to recall the approval request. For example, as the record owner, I’ve submitted the record, and soon realize that I missed a critical piece of information that should have been provided before submitting. Since I can’t edit the record once it’s submitted, I’ll have to recall the record. Recalling a record removes the record from the approval queue, and unlocks the record. Now I can make edits as needed, then submit the record again when I’m ready.
Excellent! You’ll notice that this is the last step in the process (for now). Click Save to complete Part 1 of the setup. Now it’s decision time.
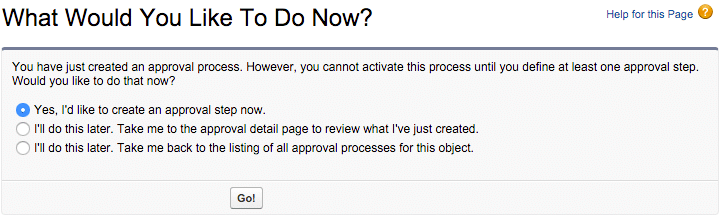
What we just configured was only part of the approval process. We haven’t yet defined the steps involved or any other additional approvers, email notifications for approval or rejection of the record, etc. This is all determined in Part 2.
If you’re ready to jump into Part 2, select Yes, I’d like to create an approval step now. and click Go! If you want to see what we just created, select I’ll do this later. Take me to the approval detail page to review what I’ve just created. I’ve selected the first option and will power through the rest of the setup and review the full process later.
Part 2 – Defining Approval Steps
Think of Approval Steps as the levels of approval. I recently created an approval process with a single step. Simple and straightforward. But your business process may be more complex and require additional steps or logic.
Today’s example will have one step: the Opportunity Owner’s manager must approve all records. After setting up this one approval step, you’ll be ready to add additional steps to your approval process if more than one step is needed.
Step 1: Approval Step Name & Description
Just like our approval process name and description, enter a very detailed name and provide a description for reference later.
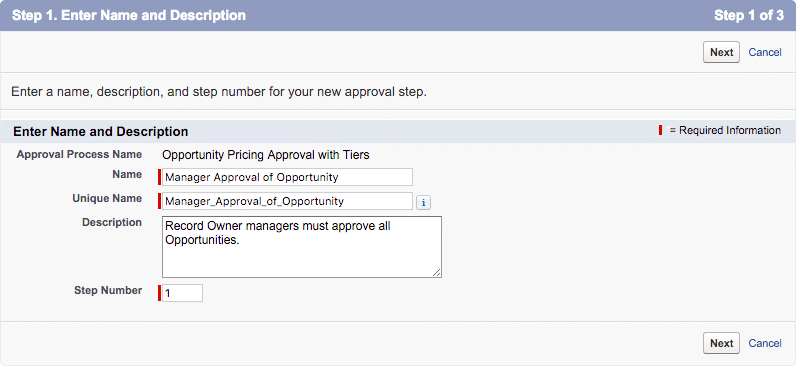
Approval Steps should be thought of the same as a nested IF statement or Lead Assignment rules. The order in which they display matters. If a record doesn’t meet the criteria for the first approval step, it moves to the next. The Step Number field indicates the step in the process. The field will automatically populate, but can be manually adjusted if needed.
Step 2: Step Criteria
Just like the Entry Criteria which determined when a record can be submitted for approval, the Step Criteria determines what records will go through this particular step.
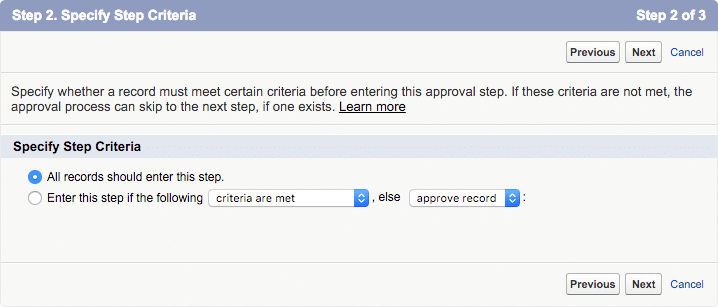
By selecting All records should enter this step, every record submitted will go through this step. No exceptions. If there are exceptions, then the second option would come into play. By adding criteria to the step, specific records would pass through to the assigned approver. The records that don’t meet the criteria would be either automatically approved or rejected based on the above selection.
In the example I’m using, the Opportunity Owner’s Manager should approve all records so all records should enter this first approval step.
Step 3: Assigning Step Approver
Now it’s time to select who the approver will be for this step. In the example, the Opportunity Owner’s Manager will be the approver in this step. Remember the Manager field we referred to in Part 1? Here’s where we get to use it!
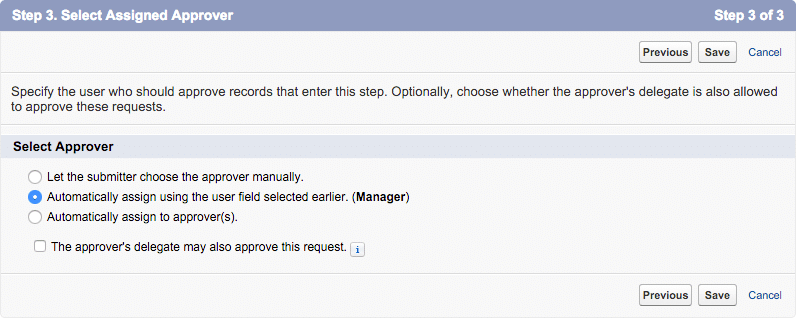
The remaining options allow the submitter to choose a specific approver manually or allow Salesforce to automatically assign the approver. Neither of these options meets the needs of the example so we’ll select Automatically assign using the user field selected earlier.
If delegated approvers are going to be leveraged, check the box to indicate that the approver’s delegate may also approve the request. Remember that a Delegated Approver must be noted on the user’s record.
Cool! Now the first approval step of the approval process has been created. Now it’s time to make another decision.
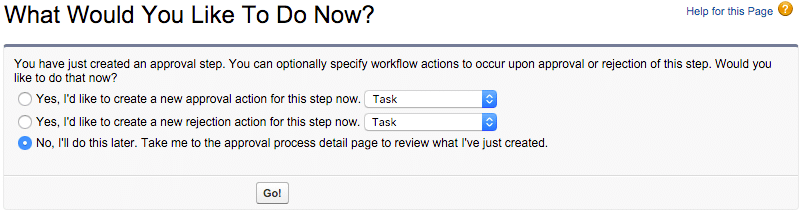
An approval process has some elements of workflow actions built in. When a record is accepted or rejected, specific actions can be defined. For example, an email can be sent to the record owner and a field or series of fields can be updated. The decision point above asks what to create next. I choose to build all of my steps first, then go back and review what actions need to take place in each so I’ve selected No, I’ll do this later. After clicking Go! we’re redirected to the Approval Process Overview page.
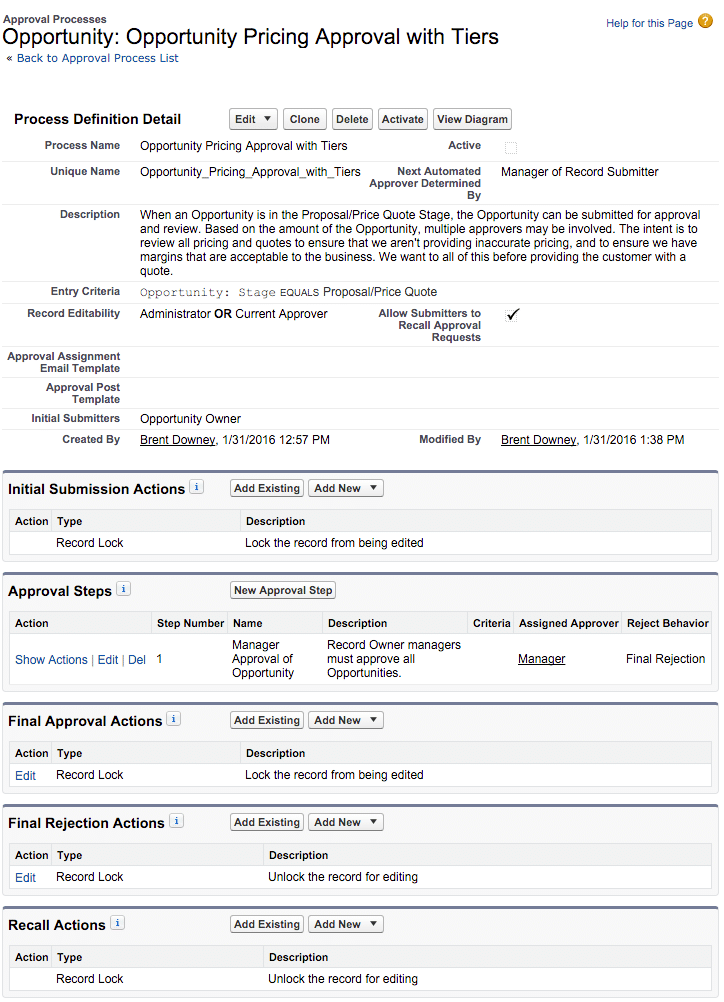
At this point, if additional approval steps were needed, use the New Approval Step button to create the subsequent approval steps. Remember that there can be up to 30 steps in a single approval process.
Once all the steps are added, it’s time to determine what happens to the record on Final Approval, Final Rejection, and Recall.
Final Approval & Rejection Actions
When there are more than one Approval Steps on an approval process, the record can be rejected to the previous step (so if it’s rejected in Step 3, it could go back to Step 2) or, a rejection in the current step would result in a Final Rejection (a rejection in Step 4 would reject the entire record and would not be sent to the previous approver).
When a record has a final approval or rejection, specific actions can take place on the record. Very similar to traditional workflow rule actions, a Final Approval or Rejection can send an email, update a field, create a task, or send an outbound message.
At a minimum, it’s a good idea to review the Record Lock actions. Depending on the process, there may be additional work to be done on record approval. In that instance, the record should probably be unlocked when the record is approved. Same on rejection.
Since there is no notification to the record owner or submitter when the request is approved or rejected, it’s also a good idea to add an email alert with a descriptive subject line and details about the Opportunity to the record owner.
Recall Actions should be reviewed as well if the approval process allows the submitting user to recall the record. Again, all of the same actions available in the Final Approval and Final Rejection Actions are available for Recall Actions.
Once all settings have been applied, it’s time to test the approval process. As with everything, best practice would be to create this in a sandbox where the environment is controlled and users won’t be impacted when testing. When the process is ready to be turned on, click Activate at the top of the page!
Additional Reading
Here are some additional resources to reference as you learn more about Approval Processes in Salesforce.

Don’t forget that approvers can use Salesforce1 Mobile to approve requests (and Salesforce recently added the ability for users to submit approval request as well) meaning that you can deal with approvals on the go
More details here: http://help.salesforce.com/HTViewSolution?id=000187495
LikeLike
Thanks for that Stephen! I’ve forgotten to mention that in the post! I’ll have to do a follow-up post!
LikeLike
There is a typo:
Approval processes don’t provide much flexibility so ambiguous our poorly defined processes either won’t work, or will need to be rehashed, so it is well defined. THE WORD ‘OUR’ SHOULD BE ‘OR’
LikeLike
There is a typo:
Then, even though you’re name is stellar and doesn’t need a description, enter a description anyhow!
Instead of ‘you’re’ it should be your.
LikeLike
Sentence repeated:
I like to write down what the goal or outcome of the process should be in clear terms. That way, anyone that comes after me can understand what the approval process should be doing and troubleshoot as necessary.
I like to write down what the goal or outcome of the process should be in clear terms. That way, anyone that comes after me can understand what the approval process should be doing and troubleshoot as necessary.
LikeLike
Initially, Record Entry Criteria is listed as First Step
An approval process is an automated way of submitting a record for approval. An approval process is made up of several elements:
Record entry criteria
Automated routing and record edit settings
Notification settings
Indicating who can submit a record
Approval steps
Final Approval and Final Rejection steps
Then, Record Entry Criteria is listed as STEP 2
STEP 2: RECORD ENTRY CRITERIA
LikeLike
I think the following sentences need some rework 😦
Be add an email alert to the record owner for Final Approval and Final Rejection since there is no
Since there is no notification to the record submitter that the record has been approved or rejected, add an email alert to the record owner for Final Approval and Final Rejection.
LikeLike
This is one of the best and thorough Approval Process explanation I have come across thus far!! Thank you!
LikeLike
Thank you, Munira! Also, thanks for the suggested edits. Apparently my proofreading wasn’t thorough enough on this one! I’ve made the edits to the post!
LikeLike
A tip for Professional Edition users:
You will most likely need to contact your AE to request Approval Processes be activated for your instance. A quick email should do the trick. And, it’s free!
Once the feature is turned on, you’ll find it under: Build | Create | Workflow
Brent, you rock!
LikeLike
Right before Step 1, you mean “…INVOKED the Setup Wizard”, don’t you?
Great work on this post, and thank you for the time and effort you put into this.
LikeLike
You are so right John! Thanks for catching that. The post has been updated.
LikeLike
Hi Brent,
You mention that “Field updates that are executed as approval actions don’t trigger workflow rules”. I’m trying to build a paid time off app, that will trigger a process after a request is approved. Since approval process will not trigger a workflow rule (that is update the leave balance field) what is an automation work around? Will it have to be a task and the specific field be manually updated?
Thanks,
Himu.
LikeLike
I don’t recall when the feature was released, but you can now create Process Builders and Workflow Rules that will reevaluate rules on that object. You’ll find the option when setting up the workflow or process builder.
LikeLike
Great article. I just used it to write my first approval process which ended up being 24 steps long each of which had 5-10 criteria. What was a complicated business case was made manageable through this article.
Thank you Brent!
Cheers,
Leonard
LikeLike
Wow! Well, I’m glad the article helped! Thanks for the comment!
LikeLike