Scheduling your time at Dreamforce can become quite an ordeal. With sessions, meetups, customer meetings and networking events, most folks find that their calendar is totally booked before even arriving in San Francisco.
When Agenda Builder goes live, there tends to be a mad dash to reserve your spot in the sessions of your choice. But often times there are scheduling issues with existing meetings or overlapping sessions. To make your time at Dreamforce exceptional, time allocation and planning is super important. Today, we are going to look at how to plan your calendar for this awesome event.
Setting Up Your Calendar
First things first. Choose an awesome calendar app that will allow you to easily create and update your meetings on the web, but also from your phone. With Dreamforce being a highly mobile event, you’ll want the ability to modify your calendar on the fly.
I personally use Google Calendar. It’s fast, flexible and available on multiple mobile apps for easy additions, subtractions and updates to events. I’ll be referencing this calendar app in this post.
Adding Pacific Time to Your Calendar
The first thing I do every year before planning out my time is add the Pacific time zone to my Google Calendar. There is nothing more frustrating than thinking you converted the time correctly in your head to find out later that you were an hour off.
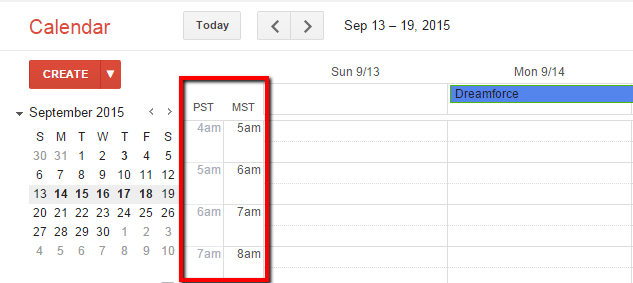
Adding a second time zone is super easy. Here’s how to do it:
1. Open Google Calendar and click the Gear icon.
2. Click Settings
3. Under the General tab, in the section titled Your Current Time Zone, click the link titled Show an Additional Time Zone.
4. Select (GTM -07:00) Pacific Time from the picklist then add PST to the box titled Label.
5. Make sure that the Display All Time Zones checkbox is checked.
6. Click Save at the top of the page to save your changes.
When you return to your calendar, you’ll notice that there is a second column for Time Zone listed and you can now use the PST time to accurately schedule your events! Once Dreamforce is done, you can remove or change the time zone.
If you prefer Outlook’s calendar, this can also be done. Follow these instructions.
Create a Dreamforce Calendar
The other reason I love Google Calendar is it’s ability to create a calendar within the calendar. My personal Google calendar includes things like my own events, my wife’s events, combined events, a life events calendar (to track birthday’s, anniversaries etc.) and so on. I also have a Dreamforce calendar which is use every year.
Separate calendars keep things simple and clean. I may have a personal recurring event that I don’t want to delete, but I also don’t want to see as part of my Dreamforce calendar. Google calendars can be turned on and off easily so I can turn off all other calendars while at Dreamforce and focus on what is important.
Here’s how to create a Dreamforce specific calendar.
1. Open Google Calendar and click the Gear icon.
2. Click Settings
3. Under the Calendars tab, under the My Calendars header, click the Create New Calendar button.
4. Enter a calendar name, and select the time zone for the calendar. Add or modify any additional settings you think are relevant, then click Create New Calendar to save the calendar settings and create the calendar.
5. Don’t forget to assign the calendar a color for easy visual reference.

Great! Now your calendar is ready to go.
Preparing for Agenda Builder
Before adding any Dreamforce specific meetings to your calendar, let’s make sure that Dreamforce is marked off on the appropriate days. I do this to create a visual guideline for the event which helps me to schedule more accurately.
Now, it’s time to schedule your events. There may not be a whole lot to schedule just yet, but if you know of confirmed parties or customer-specific events you have already agreed to, let’s enter those now. Be sure to use the new PST time zone column to schedule your events!
If you are a speaker, you will have your designated dates and times for each of your sessions ahead of Agenda Builder going live. Add those dates and times to ensure there is no conflict.
I like to add most of my events before I purchase airlines tickets. There were a few years in a row where I purchased my tickets too early and ended up having to skip some special evens.
Now that your week is pre-planned, we will be much more organized when Agenda Builder goes live.
Agenda Builder Go-Live
Before Agenda Builder goes live, it’s important to take some time to review the sessions already made public on the site. With over 1600 breakout sessions, there is a lot of content to muddle through and it takes some time. Finding the sessions you are interested in ahead of time will make the enrollment process a lot easier. You can do this by marking sessions as “Favorite.”
Here is a screenshot of one of my sessions, Secrets of a Super Hero Admin. Notice that there are three buttons at the top of the page.

The first button will tell you if you are enrolled in that session or not. If you are, you have a confirmed seat in the room! The second button is a star. This is how you’ll favorite a session. Be sure to mark any session that you find interesting as a favorite so you can have a backup session to attend should you change your mind! The last button is the share button and this allows you to share this session on your social networks!
Once Agenda Builder goes live and you’ve enrolled in the sessions that are interesting to you, mark them on your calendar!
Dreamforce does allow you to print a PDF of your agenda which is super helpful to have during the week in case your phone runs out of juice. The tool has in year’s past allowed you to export your agenda to an Outlook calendar. Personally, I don’t recommend this.
A few years ago I exported all of my sessions to an Outlook calendar and it was a mess. It ended up creating duplicate records and became such a pain that I deleted everything and hand entered the events on my calendar.
Don’t Forget About Free Time
One of the worst mistakes I ever made in my first few years at Dreamforce was to book myself solid and run like a mad man from session to session. I felt overwhelmed and ended up not feeling like I had a good time. Since then, I found that creating room in my schedule for free time is super important.
There is a lot happening at this event. You will have late nights and your feet will hurt. It’s okay to schedule some time to take a nap in a bean bag chair on Howard Street! It’s okay to skip out on a session you initially enrolled in because you want to continue a conversation with someone you just met.
Allow there to be breathing room in your schedule. Take the opportunity to network and mingle. Head to the Admin Zone to meet Salesforce MVPs and your fellow admins. Don’t let Dreamforce consume you. Schedule some down time.
It’s Your Turn! How do you plan your week at Dreamforce? What cool tips or tricks do you use to make sure you have an awesome experience?

I also make sure to favorite a few keynotes and anything that shows up when I search “Benioff”
LikeLike
Keynotes are important to add to the calendar as well! Thanks for the comment Adam.
LikeLike
+1 on the time zone issue! Last yr I printed hardcopy of each day and included the DF map with the correct location highlighted for important events. Really helpful for anyone directionally challenged like me! Also don’t be afraid to grab extra snacks wherever you go. That way you don’t miss out on any great content!
LikeLike
I always carry snacks and gum because you never know when you’ll be able to get something good to eat between sessions. Great suggestion Kelly!
LikeLike
Thanks for this great post. I only wish I could be two places at the same time because I have one of those pesky conflicts. Will your session be available for viewing after Dreamforce?
LikeLike
As far as I know, all sessions will be recorded this year! I’ll be sure to send it out to everyone post-Dreamforce once they are made available!
LikeLike
That will be awesome!
LikeLike
For some sessions, I do not see ‘Enroll’ button. Instead I see a “walk-in” button. When I click on it, it changes to ‘Walking’. What does that mean?
Where do I check my enrolled sessions? (like the calendar)
LikeLike
Great question! This means that the session is 75% full. Dreamforce allows 75% of the seating for that session to be reserved. The remaining 25% is left open for walk-ins. What that means is that you could still get a seat in the room, but you’ll need to stand in the “standby” line. Check your enrolled session on the “My Agenda” tab on the Dreamforce website.
LikeLike
A little customization I made to your great “Dreamforce” Google Calendar suggestion. I have my registered sessions in green, walk-ins in yellow, and favorites in blue to match the colors of the Agenda Builder. Really easy to see what’s what now. Then, I can look at the Agenda (in the Google Calendar) to see the colors, sessions, and locations to see where I need to be and when (or even “if”).
LikeLike
That is a great suggestion Rena! Thanks for sharing. That is a super helpful way to track sessions!
LikeLike
Ok, so as I opened this post, I thought – there’s nothing Brent can tell me about Agenda and Calendaring that I already don’t know?.. But you did it again :)) Every single time! You manage to give that great advice or teach a new thing (or 2) in every post! Thank you for the awesome tips! Hope to catch you at some point to say hi and tell you how much I enjoy your blog! Your devoted reader, Alesia 🙂
LikeLike
LOL! I’m glad that I can surprise an provide value! See you next week!
LikeLike