
PREFACE: This post is part of the Zero to Hero series.
Salesforce is a great application, but companies don’t buy Salesforce just because it looks nice. They buy it because it can make information transparent, and greatly increase the efficiency of employees. This is done through general process improvement and automation!
Salesforce has a powerful automation engine that can do things like update fields, send emails or even call Apex code to execute actions. This is where Salesforce shines and this is what we will focus on in this post.
I recently published a post called Automation Celebration: Creating My First Visual Workflow. The goal of the post was to focus on a specific type of complex automation process that would have normally been done with code. This post will focus in on the what, why and how of workflows and we’ll build a simple workflow in our Developer orgs to increase the value of the configuration we’ve already created in our family management app.
If you haven’t completed the setup of your family management app in a developer org, you may want to go back and review those posts.
Intro to Salesforce Workflow Rules
As previously mentioned, workflow rules help to automate business processes which increases user efficiency and can also assist in the prevention of dirty data. By automating specific actions in a process, users can complete other tasks sooner. Workflow is a bit different than Process Builder which is also an automation tool provided by Salesforce. To see the main differences, and learn which to use when, take a look at Automation Showdown: Workflow vs Process Builder!
Workflow rules are made up of three different parts:
1. Criteria Rules – these rules are used to determine when and how a workflow rule should be triggered. Setting up the criteria is similar to creating report criteria. It can be entered into Salesforce as a series of statements using picklists (i.e.: Status equals True), or it can be done with the creation of a formula.
2. Immediate Actions – immediate actions are specific events that take place at the very moment the workflow is executed (aka evaluated to True).
3. Time-Based Actions – time-based actions are specific events that take place at a pre-determined or calculated time in the future. For example, today we will be building a time-based workflow rule that will send a reminder email before the next anticipated oil change date.
There are now five actions that can take place on an Immediate or Time-Based action:
1. Email Alerts – email alerts allow the workflow rule to send a specified email template to a specified user or set of users. These email alerts use email templates housed in Salesforce and can include company logos and merge fields or can be 100% custom coded in HTML.
2. Tasks – tasks are action items that have a due date. Typically these records are assigned to another record with a specific action item that needs to take place sometime in the future. Workflow rules can schedule tasks to do things like set up a follow-up to schedule an appointment or follow-up with a contact.
3. Field Updates – this is one of my favorites! Field updates allow specific fields to be updated to a specified value when the workflow rule is executed. I particularly like this feature for “hidden” field updates, such as checkboxes on a record, because those checkboxes can be used to kick off other workflow rules!
4. Flow Triggers – this feature is currently in Pilot (as of Spring ’15) but is super powerful. This single action can summon and execute a Flow. Flow is like a crazy workflow on steroids that can do a lot of similar actions as Apex, but it doesn’t require that you know code. I wrote about how I used this action in my Automation Celebration post.
5. Outbound Messages – this is another very powerful feature that sends an API message to an external data source. This may then execute a series of other automation flows in that system depending on the configuration.
There is an amazing amount that can be done with these five action items. What we build today will be very simple but I’ll provide some additional use cases for workflows that may help get your imagination running!
Collecting the Requirements
Hopefully, you’ve seen a theme in posts which is that collecting requirements are essential to creating successful processes in Salesforce. Workflow rules are no different. In fact, requirements gathering probably doesn’t go far enough. It’s wise also to map out the process being automated to ensure that all bases are covered.
Requirements for workflow rules are particularly important because there may be a need to add additional hidden fields or changes to existing fields may need to be done to create a workflow that will work for the requirements. All of the fields that will be used as part of the criteria need to be built before the workflow rule can be created.
Here are the requirements for today’s activity. If you have been following along with the Zero to Hero series, you know that we are building a family management app so that each one of you have a practical application to use in your daily life. We have been focusing on tracking automobiles, repairs and repair shops using standard and custom objects.
As the configuration stands today, there is no automated reminder for us to schedule the next regularly scheduled oil change or other maintenance. This is currently being done manually. Today, the workflow rule we’ll create will send us an automatic email 90 days after an oil change repair has been created.
Here is what we’ll need:
- A text email with details on the vehicle and a reminder of what additional services need to be completed.
- A workflow rule that will evaluate when a new Repair is created where an Oil Change was part of the services performed.
- A time-based Email action that will send the email to the owner of the automobile record 90 days after a repair record is created.
Ready to build it? Let’s go!
Building a Workflow Rule
Create the Email Template
While the workflow rule itself can be created before the email template is created, I know that we need to create the template before we can create the email action on the workflow rule. That is why we are going to start there first.
1. Login to your Salesforce developer org and click Setup in the upper right-hand corner of the page.
2. Under the Administer section, click Communication Templates | Email Templates.
3. Click New Template to launch the template wizard.
4. For this email, we’ll be using a Text template that should be selected by default. Click Next.
5. Choose a folder location for this template to live. You may leave the default selection and change the location later.
6. Check the box Available for Use. This will allow us to select the template when the email action is created a bit later.
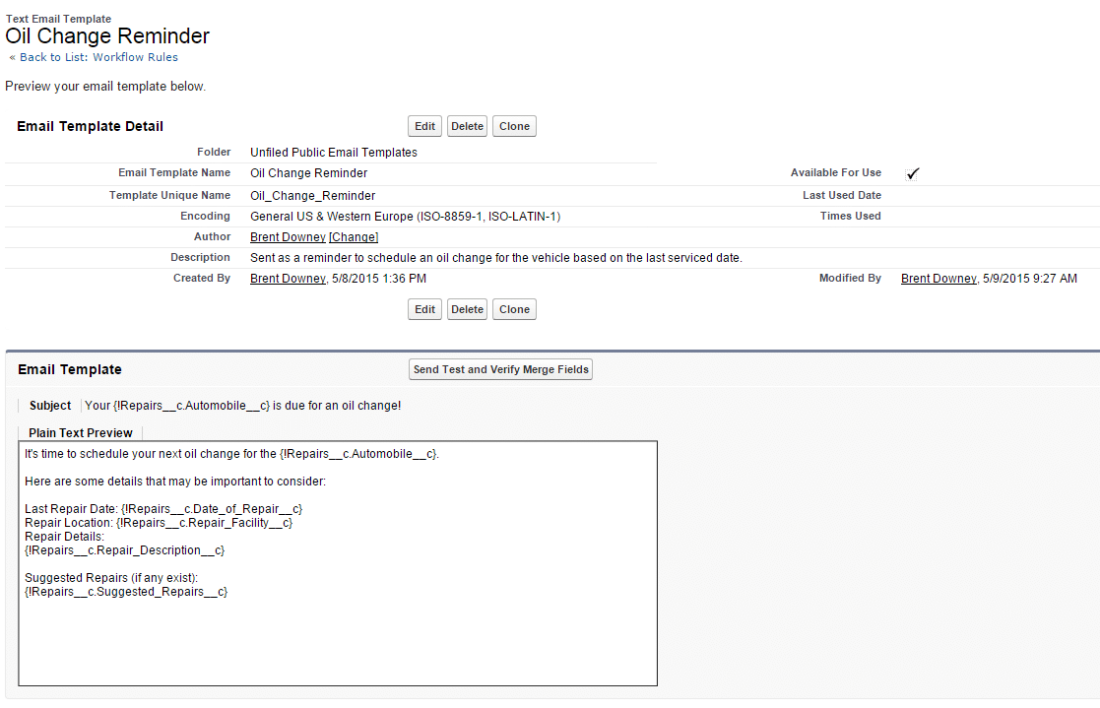
7. Provide the template a name. I’ve called mine Oil Change Reminder.
8. Create a subject line. I’ve entered: Your {!Repairs__c.Automobile__c} is due for an oil change!
NOTE: {!Repairs__c.Automobile__c} is a merge field and will populate the value in the indicated field in the template when the email is generated. In this example, it will populate with the name of the Automobile listed on the record. To create a merge field, use the picklists at the top of the page. First, select the object (Repairs in this case) and then choose the field you want to merge. Salesforce will provide the syntax for the merge field. Simply copy it out and paste it into the location of the template you want the value to appear.
9. In the Email Body field, enter the details you would like to see on the email when it is sent. Here is what I’ve included:
It’s time to schedule your next oil change for the {!Repairs__c.Automobile__c}.
Here are some details that may be important to consider:
Last Repair Date: {!Repairs__c.Date_of_Repair__c}
Repair Location: {!Repairs__c.Repair_Facility__c}
Repair Details:
{!Repairs__c.Repair_Description__c}
Suggested Repairs (if any exist):
{!Repairs__c.Suggested_Repairs__c}
NOTE: The above merge fields are specific to my developer org. You’ll need to generate your merge fields in your org to ensure the correct syntax based on the field names in your specific org.
10. Once the email is formatted the way you want it and all merge fields are entered, click Save to complete this step. When completed, your template should look something like this:
Great! The email template has been created, and we are now ready to build the workflow rule itself!
Set the Default Workflow Rule Owner
Before time-based workflows or approval processes can be activated, a workflow owner needs to be assigned. To do this, click Setup | Create | Workflow Rules & Approvals | Settings.
Under Settings, enter your name as the Default Workflow User and click Save.
Building the Workflow Rule
Workflow rules need to be built in the correct location. In this example, we’ll be creating the workflow rule on the Repairs object since there isn’t typically a need to modify or edit the Automobile object.
Generally, without editing a record, the workflow rule can’t evaluate. However, there are some exceptions. When setup correctly, workflow rules can execute then reevaluate all other workflow rules on that object to execute workflow rules that now meet another workflow rules criteria.
Workflows can be evaluated when a record is:
Created – the workflow will only be evaluated and executed at the time the record is created.
Created and every time it’s edited – the workflow rule will be evaluated at the time of creation, and every time there is an edit on the record regardless of what was edited or updated. This option cannot be used for time-based workflows.
Created, and anytime it’s edited to subsequently meet the criteria – the workflow rule is only evaluated when the record is created and when there are updates to the record that match the workflow rule criteria. Anytime there are edits that don’t meet the criteria for the workflow rule, the workflow rule does not execute for evaluation.
Okay, now that we have this information down, let’s build the workflow rule.
1. In Setup, in the Build section, click Create | Workflow Rules & Approvals | Workflow Rules.
2. Click the New Rule button to create a new Workflow Rule.
3. On this step, we need to select the object that the workflow rule will relate to. Since we want the workflow rule to be evaluated every time a Repair record is created, we’ll choose the Repair object from this picklist. Select Repair then click Next.
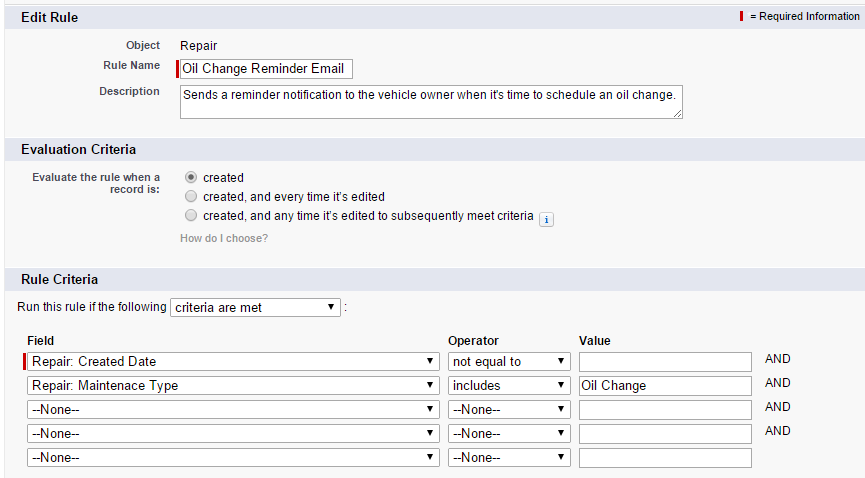
4. Give the Workflow Rule a name. I’m calling mine Oil Change Reminder Email. Don’t forget also to enter a brief description. This will help when needing to access a specific workflow in the future.
5. This workflow rule should be evaluated only when the Repair record is created. In the Evaluation Criteria section, select the radio button titled Created.
6. Now it’s time to enter the criteria. In this case, we are not going to build a formula, but if you were, use the Run this run if the following picklist to read formula evaluates to true. Today, we are going to leave this as the default criteria are met and enter two lines of criteria using the series of picklists. Here’re the criteria to enter:
Field: Repair: Created Date
Operator: not equal to
Value: null
NOTE: The value here is not “null” but is blank. Don’t enter any text into the Value field.
Since the workflow rule will execute every time a record is created, we technically don’t need to enter criteria. But, since at least one criteria is required on the workflow rule, we need to enter something. Since every record created in Salesforce has a Created Date, we can indicate through the criteria that this date should not be blank (null). This will satisfy the requirement.
Field: Repair: Maintenance Type
Operator: includes
Value: Oil Change
Because the Maintenance Type field is a multi-select picklist, the equals operator doesn’t work unless the only value selected in this field is Oil Change. Because it is possible to have more than one service performed at a time, the includes operator will look at each value in this field and execute when the value(s) selected in the filter criteria are selected in the field on the record.
7. Click Save & Next to advance to the next step in the process.
The shell of the workflow rule is now created, but we don’t have any actions attached to it. If we activated the workflow rule right now, nothing would happen when it is evaluated! Let’s add some actions to this workflow rule to make it meaningful.
8. Under the Time Dependant Workflow Actions header, click the Add Time Trigger button.
9. Before we select the specific action we want to execute when the workflow is evaluated, we need to set the time dependency. Our requirements stated that an email should be sent 90 days after the repair record is created (average time between oil changes for most vehicles). So, we’ll create a time trigger that looks like this:
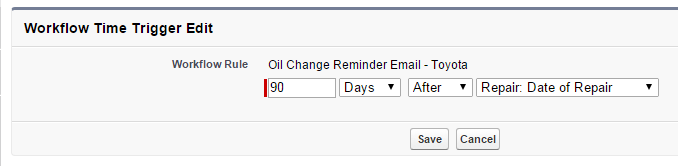
I chose Date of Repair as the date field I want to trigger the email from because the repair record is not always created on the same day the repair was performed on the vehicle.
Click Save.
10. After clicking Save, you’re redirected back to the Workflow Rule details. You should notice that there is now a new section under the Time-Based Workflow Actions header that includes our newly created time trigger. In this section, click Add Workflow Action to create a new action and select New Email Alert from the list of available actions.
11. Provide a description for this action (which becomes the Unique Name) and then select the Email template using the lookup icon. This will be the template that we created earlier.
12. Next, select the recipients of the email. This can be users, record owners, related email address fields, etc. To keep thing simple, select a user or the record owner. Scroll to the bottom of the page and click Save.
13. If we wanted to add more than one workflow action to this Workflow Rule, we would repeat steps 8-12 to add additional workflow rules to either the Immediate or Time-Based Workflow action sections. However, since this example is only adding one workflow rule action, I’m going to now click Done to complete the setup of this rule.

14. Before we can test the rule, we need to activate it. Click Activate at the top of the page and this workflow rule is now live! Great job!
Testing Your Workflow Rule
It’s important that any time any new configuration is created, it’s done in a sandbox or developer org, and it’s tested. There may be unintentional conflicts when the functionality that needs to be addressed and it’s better to find these issues in a test environment than in production. Being that we are working in a developer org, this works out well for us!
Testing workflows is easy. We’ll update the record to meet the criteria that we’ve entered as part of the Workflow Rule then see if the workflow rule actions execute. Time-based workflow rule actions will not be executed immediately, but we will be able to see that they are queued and ready to execute.
Before we begin, you’ll want to have an Automobile record created, and a Repair Shop record created. If these don’t exist yet in your dev org, create one of each before proceeding.
1. Find an Automobile record in Salesforce and on the Repairs related list, click New Repair.
2. Choose the Repair Facility using the lookup field and satisfy any additional required fields on the object.
3. In the Maintenance Type field, select Oil Change.
4. Enter a date in the Date of Repair field. Since our workflow triggers an email 90 days after this date, it must be populated for the workflow rule to execute the rule’s time-based action. If the field is not already required on the repair page, update the page layout to make it required.
5. Click Save on the Repair record.
6. Navigate to Setup | Time-Based Workflow (found under the Monitor section).
7. Using the picklist criteria, enter the following: Workflow Rule Name in the first picklist, equals in the second and then enter the name of the Workflow Rule created in the text field. Once that information is provided, click Search.
8. The search should result in one value returning, and it will include the Repair Record Name, the Workflow Rule Name, and the Scheduled date. Confirm that the Scheduled date is 90 days in the future from the repair date provided on the record.
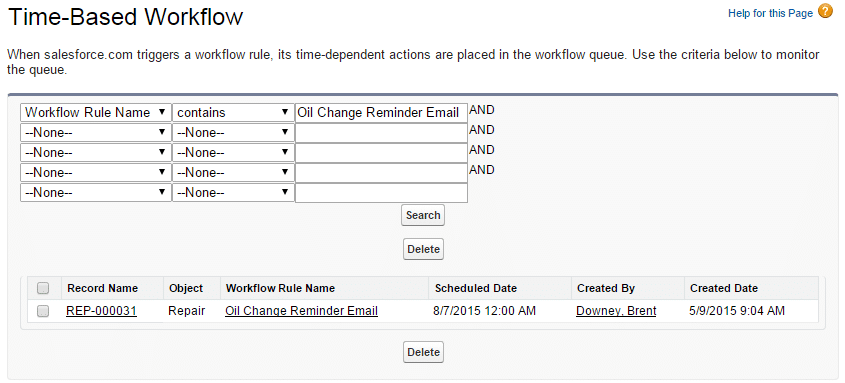
If a search result did not return it means that either the Repair record didn’t meet the workflow rule criteria, or the time-based workflow rule search criteria in step 7 is not correct. Go back and validate both, and then start again from step 1.
Once the workflow rule executes, and you have seen the workflow rule action in the time-based workflow queue, the workflow rule is successfully created and operational! No additional work is needed!
Great job!
Additional Challenge
If you successfully completed this workflow, you now have enough understanding to make a modification to this workflow. So, here is my challenge to you. Once you’ve mastered the above, try this.
Each vehicle has a recommended service interval. For example, one of our cars recommends an oil change every 90 days while another recommends every 210 days. The workflow that we built today only works for one of the vehicles. See if you can modify/create a workflow for your specific vehicles based on the manufacturers recommended service intervals!
Resources & Additional Materials
1. Salesforce Help documentation
2. Shell Black Whiteboard: Workflow Rules: Part 1
3. Shell Black Whiteboard: Workflow Rules: Part 2
4. Examples of Workflow Rules
5. Creating a Workflow Rule (Salesforce Video)

Great stuff, thanks Brent. Can you do these weekly or daily please????? Just kidding, I do really appreciate these. It is the best tutorial I’ve found for my learning style. Thanks again Sir!
LikeLike
Thanks Mark! I appreciate the kind words!
LikeLike
nice post! Q: are you aware that flow triggers is being superseded by Process Builder? Flow triggers from what I understand can no longer can be activated in production unless you were on the pilot before spring 15 and had at least one flow trigger in prod.
LikeLike
Thanks for the details Mike! That’s what I’ve been hearing. Looks like I need to update my process to use Process Builder!
LikeLike
Hello Brent,
Can you give a short summary of how to complete the challenge? Thank you!
LikeLike
Hey Chris! The post is pretty detailed. If you’ve followed through the Zero to Hero series, the build in the post will make sense. If you’re just jumping into this post without having completed the Zero to Hero series, you’ll need to read this more conceptually.
LikeLike
Hi Brent, i’m working on workflow and it says
Picklist value does not exist at rule criteria.
LikeLike
Hi Brent,
I signed up on your blog some time ago but have recently picked up the training to become an Admin. I have a question about the exercise above. I followed the steps and have checked and re-checked my configurations. However, when I “Send Test and Verify Merge Fields”, all of my merge field values are blank. I’ve started from scratch, and it occurred again. Any ideas why the data is not pulling to the email template? Thanks, and I really appreciate all the work you have put into this page.
LikeLike
Please disregard this post. It dawned on me that it was a template and not the actual email so the data would not be displayed. Sorry. Just had a moment.
LikeLike
I’m glad you go this working, Rob! Thanks for reading and for your comment.
LikeLike