
Hundreds. This is the number of times you have probably heard about all of the amazing things that the Cloud Flow Designer (formerly Visual Workflow) can do. But for the non-technical, declarative developers like myself, my mind hasn’t properly wrapped itself around the complexities of the tool and as a result, I had nearly given up on it.
Until recently.
There has been a lingering problem at ReadyTalk that I have been wanting to solve for some time but traditionally, the solution would require code. We have a full team of developers that could probably fix this problem easily, but I wanted to figure it out on my own.
I’ve conquered this problem using Cloud Flow Designer, I’ve celebrated (just like the kid in this picture – literally) and now I want to share the results with you.
While I try not to post org-specific “how-to” posts on Admin Hero, I think that the solution is something that can be easily modified and applied to similar scenarios. Plus, I want you to see that this isn’t as scary as it may seem.
Before we begin, you should know that this is not a comprehensive post on Cloud Flow Designer. I am not experienced in the application enough to speak to the specifics. Instead, I simply want to share the problem I was faced with and the solution that I was able to hack together using the Cloud Flow Designer.
In addition, I am going to provide you with an overview of the solution which means that I will not outline every single step or explain every element of the solution. That’s where you’ll need to do some additional research!
Okay, let’s go!
The Thorn In My Side
Before we get into the details, let me explain the business problem I am trying to solve.
Sometimes, ReadyTalk customers request that we opt all users from all emails with the exception of a designated “Account Admin.”
In the past, this has been managed by doing several mass updates on the contact records to opt everyone out of emails. While easy to process, it has turned into a nightmare from a data integrity perspective and we really wanted to find a way to automate this process.
Here are the requirements I was trying to meet:
- On the Account record, include a checkbox called All Account Email Opt-Out which when checked, would automatically opt-out all contacts associated with that account except for those contacts who have the Account Admin checkbox checked.
- When the All Account Email Op-Out checkbox moves from checked to unchecked (True to False), opt-in all Active contacts under that account into two of our mailing lists.
While a workflow rule will update the appropriate fields on the Contact record, it requires that the contact record is edited before the changes are applied. With potentially hundreds of contacts per account, this wasn’t a feasible solution.
Code was an obvious solution, but I wanted to try to do this using declarative technology, so I turned to Process Builder. Using only Process Builder, I was able to create a similar flow, but again, the contact record had to be modified and saved in order for the process to take place and the updates to work.
That is when I decided to focus on the Cloud Flow Designer (which we will call Flow for short).
Flow vs Process Builder vs Workflow Rules
Before we get into the details of Flow and super simple solution, let’s talk about Flow and Process Builder. I often see questions throughout the community and on Twitter asking about the difference between Flow, Process Builder, and Workflow Rules.
This table outlines the benefits and features of each (including Approvals) which outlines the differences nicely. This table and additional information related to the table can be found by clicking here.
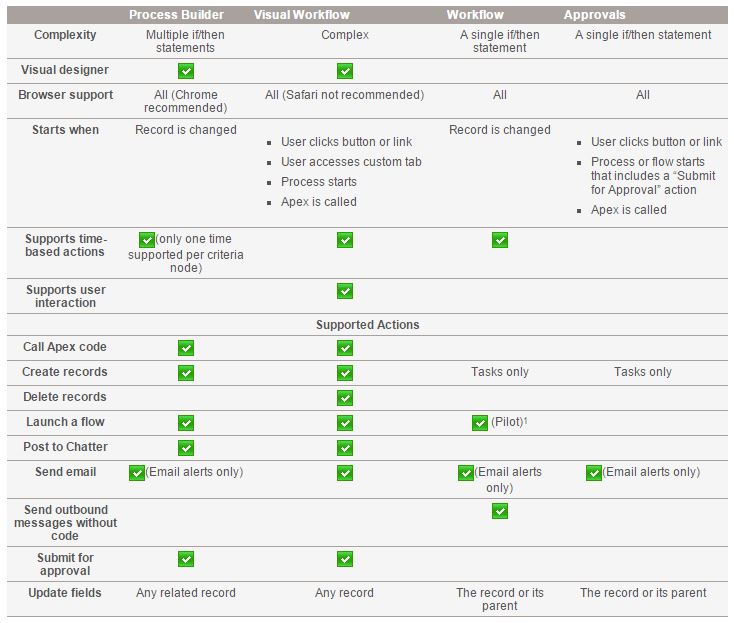
Notice that Process Builder is similar to Workflows in that they work only when a record is changed. Based on my requirements, the problem couldn’t be solved using only Process Builder or only Workflows.
However, Flow (Visual Workflow in the table) starts when a user clicks a button or link, when a user accesses a custom tab, when a process starts, or when Apex is called. In addition, it can do everything on this list except send an outbound message without code. This is exactly what I need in order to complete this request.
Some Comments on Flow
I’ve gone through the Visual Workflow guide and was able to successfully create a working flow. But, the problem with all of those workbooks is that they don’t tell you why you are taking those specific actions, they just explain how. So, while I built a flow, I had no idea how to use the elements to recreate it.
So, I began from scratch – learning Flow as I went. If you aren’t familiar with Flow, I would encourage you to go through the workbook or read the help documentation as a baseline. Get familiar with the application and the UI before you get started.
Recently, some new features were released called Headless Flow and Flow Trigger which allowed any flow to be triggered without requiring a screen to be presented to the user. Essentially, Flows can now operate similarly to Workflow Rules; quietly in the background without no one knowing. Basically, you can use Apex or a Workflow Rule or Process Builder to trigger a flow when the specified conditions are met.
Finding this information was exactly what I needed to know in order to provide a solution that met the requirements my company was looking for.
The Beautiful, Code-Free Solution
The solution to the above requirements took some time to figure out, but I ended up creating the following:
- Two Flows; one that opts-out the contacts on an account and the other that opts them back in via field updates.
- Two Workflow Rules which evaluates that status of the All Account Mass Email Opt Out field on the contact record and triggers the Flow Action for the appropriate flow.
I am going to show you the solution to the opt-out portion of the request. The opt-in process is a clone of the following functionality with an update to the criteria and fields which will be updated.
Building the Flow
Building this flow was no easy task. I spent a full day experimenting with the different Flow elements, reading one of Brian Kwong’s blog posts on how to create a headless flow and I was truly stumped. But, I eventually go it figured out and realized that I was over complicating the entire process! Here’s the flow I ended up with:
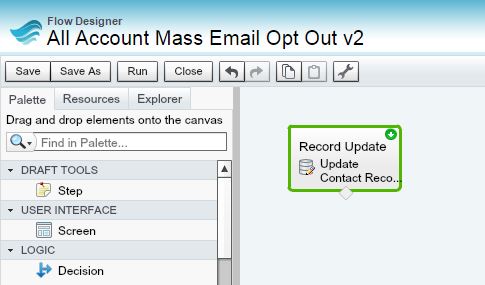
Yup! That’s it! A single action. No lookups, no decision trees. Just one step.
Notice that it is a Record Update step which means that the only thing this flow is going to do is update the appropriate contact records once triggered. This next screenshot shows the details of this step.
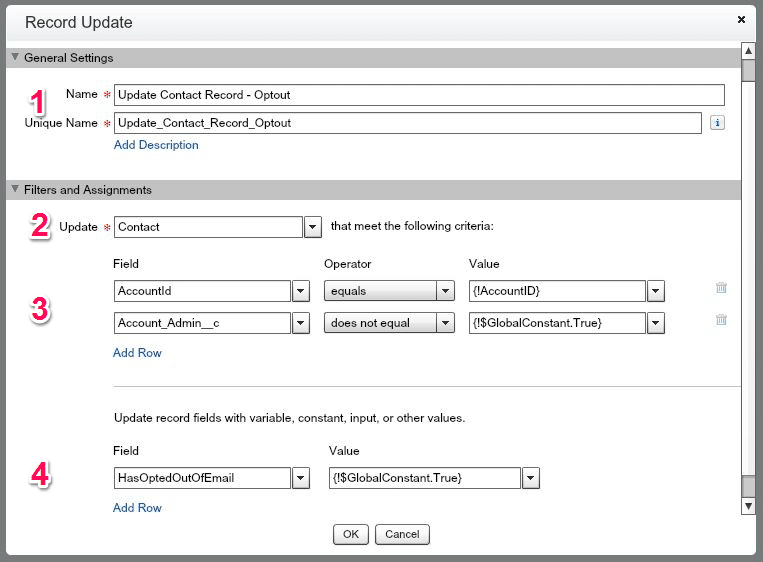
Let me walk you through this screen really quick. The numbers on the screenshot align with the numbers below.
- This step has been provided with a name. This is the same process as creating a custom field or object and giving it a name.
- Contact is the object that I want to update in this step, so I’ve chosen it from the list of available objects.
- Filter criteria allow me to select which records will be updated from that object. In this case, I want to update Contact records related to a specific account (AccountID) and where the Account Admin field does not equal true.
- This section indicates what updates will take place. I’ve decided to update the standard Email Opt Out field so that it is equal to True.
So within this one step we’ve indicated the exact records we want to update and what the update should include.
Now that the update action has been created via a flow, we still need to create a way to trigger the flow so that it processes records. That’s where our workflow rule comes into play.
Building the Workflow Rule
UPDATE: The Process Builder has superseded flow trigger workflow actions, formerly available in a pilot program. Organizations that are using flow trigger workflow actions can continue to create and edit them, but flow trigger workflow actions aren’t available for new organizations.
This part is easy. I’ve created a standard workflow rule on the Account object with the following formula criteria:
AND(
ISCHANGED( All_Account_Mass_Email_Opt_Out__c ),
All_Account_Mass_Email_Opt_Out__c = TRUE)
When the All Account Mass Email Opt Out field on the Account has changed and it is now equal to True, the workflow will activate the workflow action.
The Workflow Action added to this Workflow is the new Flow Trigger action. This action allows you to select a flow you want to trigger and map values from the Workflow object into Flow variables. Here’s my Flow Trigger action.
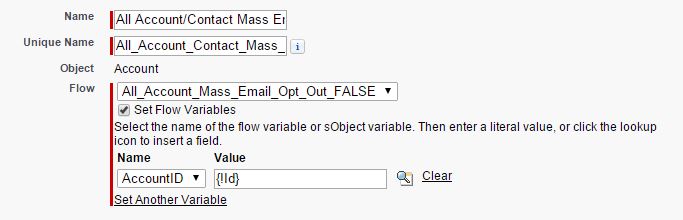
A name was provided to this action, and I selected the flow name from the picklist provided. After checking the Set Flow Variables box, a picklist appears where any variables created in the Flow appear. I’ve selected my AccountID variable and selected the value I want to pass to this variable when the workflow rule fires.
So, what happens now is the workflow is triggered when the criteria are true, and it will pass the AccountID into the flow created and execute the update actions outlined in the Flow. WOWZERS!
What once required code, I’ve done with a Workflow and a single-step Flow!
Now, users can check the All Account Mass Email Opt-Out checkbox on the account and automatically, all contacts are magically opted out of emails!
Parting Thoughts & Observations
I’ll be honest. I have been intimidated by Flow for a while. It took me nearly two full days to dig into Flow to solve this problem using Flow, but I figured it out. I leveraged the community and various resources to connect the dots. And it feels good! I’m glad it took me 5 revisions and endless testing!
The feeling of struggling, then accomplishing is like no other. Don’t be intimidated by Salesforce. It may be big and seemingly complex, but you can do this!
Get outside of your comfort zone and experiment with these tools. You’ll be surprised at what you’ll learn and feel great with the results.

Quick Question :- It also achievable with Process Builder then why you have used Flow and Flow Trigger (Obsolete).
LikeLike
Yes, it probably could be done with Process Builder but as I was doing the research to figure this out, I found Flow Triggers before I learned about how to use something similar with process builder. Either way works. I am just glad I was able to find a solution without involving a developer!
LikeLike
Love the post! I’m so glad you checked out visual workflow. It’s one of my favorite awesome admin tools.
I love that you included the comparison chart. I also wanted to let you know we have a unit on this on trailhead which takes you through all the tools in detail, and helps you decide which one is right for you: https://developer.salesforce.com/trailhead/business_process_automation/process_whichtool
This unit was written by the same writer who created the chart, Sam Reynard.
LikeLike
I’ll have to go check that out! Thanks Chris!
LikeLike
Wowzers, indeed! Thanks for posting this; I’ll be able to cut my two days of research down to 1.5. 🙂
LikeLike
It was definitely a process but I am so excited that I was able to get it figured out!
LikeLike
Brent, congrats! Be careful if you do any mass updating. This issue (https://success.salesforce.com/ideaView?id=08730000000DhBlAAK) will disallow you from mass updating your accounts and setting that value. 😦 It’s a limitation of process builder calling a Flow, not sure if it impacts Flow Triggers.
If you do decide to mass update anything, it wouldn’t be very hard to update the Contacts directly, but just wanted to let you know of the limitation.
LikeLike
Thanks Scott! I’ll have to read through the Flow limits to see if we may hit any of them. That didn’t even cross my mind – thanks for letting me know!
LikeLike
Timely post. I’ve been waiting on the Flow sidelines for awhile as well but finally put my big boy pants on and created a flow that had similar requirements. I needed to update contacts to opt them out of email preferences based on an update from account.
In the end I created an account process builder process that calls my flow to update contacts. For extra credit I retired two account workflow rules and folded them into my process as well. My process now has 3 decision nodes – 2 that perform simple field updates and 1 that calls my flow.
LikeLike
This was a timely post then! I thought about using process builder for this, but opted for Flow since I’ve been wanting to learn how to use it so it was a good excuse! I’m glad that this worked well for you!
LikeLike
Hey Brent, this is a great how-to – you point out some really good things to take note of. And it’s inspiring. But apparently headless flows and flow triggers are not yet generally available? At least that’s what I keep reading as I search for help. 😦
That said, today has been a great learning experience, and I really do thank you for posting this and giving me the push I needed to start experimenting with Flows. Next up: Process Builder!
LikeLike
Last I heard, headless flows are GA, but Flow Triggers are in pilot. Here’s some documentation from the Help & Training documentation but I think this is about all there is at the moment: https://help.salesforce.com/HTViewHelpDoc?id=creating_workflow_flow_actions.htm&language=en_US I’m glad you are inspired to jump in and learn some new stuff! That was the goal of the post.
LikeLike
Hi Brett – gotta question for ya. I’m building a somewhat complex flow which is triggered by a process. The logic could be accomplished by either creating a flow or trigger. I was just wondering, in cases where either a flow or a trigger will do the job, is it better to use a flow than a apex trigger?
LikeLike
Hi Dustin – great question! Generally speaking, if you can accomplish what you are wanting to accomplish with Flow and/or Process Builder over an Apex trigger, I would go that route. Be sure to look at your process though. I did learn the hard way (with the functionality in this post actually) that there isn’t a bulk processing option in Flow or Process Builder right now so depending on the number of records that would be processed through the flow, a Trigger may be a better option.
LikeLike
Great. Thanks for letting me know. I appreciate it. Knowing this will likely save me some work and headaches in the future. Apologies for calling you Brett. :0)
LikeLike
Brent,
thanks for this write up! I think you hit the nail on the head when you say “the problem with all of those workbooks is that they don’t tell you why you are taking those specific actions, they just explain how. So, while I built a flow, I had no idea how to use the elements to recreate it.” I went through all of the trailhead modules on Flow, at least 5 of them, feeling the same.
I now have a use case where I think Flow could be an ideal solution, if it is in fact doable and I can figure out how to set it up – but that’s where I need help.
I’m trying to set up a flow that may be placed on a record page in Lightning that will look through all related records of a certain type and criteria and loop through each, allowing the end user to evaluate each record and make a quick update to it before moving on to the next.
I think this should be possible with Flow (correct me if I’m wrong), but I’m having trouble with even the first step, which I believe is just getting the id from the record I’m on so I can identify records related to it.
If I had the record ID of the record I’m starting at, I believe I should be able to use an sObject Collection Variable to grab the related records meeting the criteria, and then I’m hoping that with a Loop I can display a handful of fields on the Screen, allow the user to update a field or not, and move on to the next related record in the loop.
If this is possible, please help me figure this out!
PS. Thanks for the awesome blog
LikeLike
Ok, so I found out how to pass the record ID into the flow by setting up a variable in the flow, and have since been able to map out the rest of the flow the way I think it should be, but when I go to test it, it’s not quite behaving as expected – it’s simply jumping straight from the first screen to the last screen, without any prompts in between. Can you take a look and identify what I may be missing?
To describe what it should be doing:
1. start screen – embedded on record page of parent object with flow lightning component, with the current record id passing into the flow as a variable), progressed by clicking Next to begin.
2. fast lookup – looking for all child records of a related object called Resources, where the parent id equals the record id passed in through the variable, and add those records to an sObject collection variable.
3. loop – for each resource in the collection, assign an sObject variable and evaluate the next step
4. decision – identify the record type and then display the corresponding screen
5. screen(s) – depending on the record type, display the relevant fields for review and allow the end user to update a checkbox field or not, before proceeding to the next record in the loop
6. fast update – updates the record with the checkbox field updated on the previous screen
7. ending screen – once all child records have been reviewed, end on a final screen to let the user know the fields they have reviewed have been updated.
This is my first time trying to use Flow in the real world, previously only following steps as directed in trailhead, but conceptually I think this should work. If it’s not, please let me know!
LikeLike
One more update/ reach out for help. I have a Flow setup which is almost completely working as expected, except for the records saving as they should. I’m guessing I may just have my update action in the wrong place in the Flow, but I’ve tried it a few different ways without success, so I’m asking for help.
I’ve tried using a Fast Update both inside and after the Loop, but the result is the same – none of my records update with the change made to the Approved field on the Screen which is inside the Loop. The Flow takes me through the screens as expected, but weather I select to Approve a Resource or not, none of the records in the collection variable are updated.
I also tried using a Record Update inside the Loop, but when I do that, all records passing through that element are updated to Approved, even if they were not selected as Approved on the screen prior (within the loop).
Please let me know if any of this needs further clarification, and help me understand how my flow should be setup to update the records as intended!
LikeLike
I guess nobody responds on this website anymore..
PS. I ended up figuring it out myself, so I guess I’ll just keep the solution to myself as well.
If for nothing else, thanks for giving me a place to rant
LikeLike