
PREFACE: This post is part of the Zero to Hero series.
The configuration possibilities in Salesforce are endless thanks to custom objects and custom fields. But sometimes, the options can be overwhelming – especially when it comes to creating relationships between objects.
Custom fields are not as scary as they may seem. Today we look at the custom field types that can be created, dissect the difference between a Lookup and Master-Detail relationship, and we go hands-on; building custom fields for our family management app.
Understanding Field Types
Salesforce comes standard with fields on every standard object and it creates “standard” fields on every custom object you create, such as record name, Created By and Last Modified By fields. But these standard fields don’t meet the need of every organization. That is where the use of custom fields comes into play.
On every object, Salesforce provides the ability to create up to 500 custom fields! That is a lot, and that means that the configuration options are limitless. Standard and custom objects can be customized to capture any type of information your business process requires.
Here are a list of the field types that can be created and a description of each. This information is pulled right out of the Help & Training section. You can find the full article and get a printable version of the following table on Help & Training.
| Type | Description |
|---|---|
| Auto Number | Automatically assigns a unique number to each record. The maximum length of any auto-number field is 30 characters, 20 of which are reserved for prefix or suffix text. Not available for external objects. |
| Checkbox | Allows users to check a box, indicating a true or false attribute of a record. When using a checkbox field for a report or list view filter, use “True” for checked values and “False” for unchecked values. The import wizards and the weekly export tool use “1” for checked values and “0” for unchecked values. |
| Currency | Allows users to enter a currency amount. The system automatically formats the field as a currency amount. This can be useful if you export data to a spreadsheet application. Not available for external objects. |
| Date | Allows users to enter a date or pick a date from a popup calendar. In reports, you can limit the data by specific dates using any custom date field. |
| Date/Time | Allows users to enter a date or pick a date from a popup calendar and enter a time of day. They can also add the current date and time by clicking the date and time link next to the field. The time of day includes AM or PM notation. In reports, you can limit the data by specific dates and times using any custom date field. |
| Allows users to enter an email address of up to 80 characters, which is validated to ensure proper format. If this field is specified for contacts or leads, users can choose the address when clicking Send an Email. Note that you can’t use custom email addresses for mass emails. | |
| Formula | Allows users to automatically calculate values based on other values or fields such as merge fields. Not available for external objects. |
| Geolocation | Allows users to specify a location by its latitude and longitude. Geolocation is a compound field that counts toward your organization’s limits as three custom fields: one for latitude, one for longitude, and one for internal use. Not available for external objects. |
| Lookup Relationship | Creates a relationship between two records so you can associate them with each other. On the parent record, you can display a related list to show all of the records that are linked to it. You can create lookup relationship fields that link to users, standard objects, or custom objects. If a lookup field references a record that has been deleted, Salesforce clears the value of the lookup field by default. Alternatively, you can choose to prevent records from being deleted if they’re in a lookup relationship. |
| Master-Detail Relationship | Creates a relationship between records where the master record controls certain behaviors of the detail record such as record deletion and security. Not available for standard objects or external objects, although you can create a master-detail relationship field on a custom object that links to a standard object. Master-detail relationships cannot be used with campaign members. |
| Number | Allows users to enter any number. This is treated as a real number and any leading zeros are removed. |
| Percent | Allows users to enter a percentage number, for example, ’10’. The system automatically adds the percent sign to the number. |
| Phone | Allows users to enter any phone number. Character limit is 40. Salesforce automatically formats it as a phone number. If you are using Salesforce CRM Call Center, custom phone fields are displayed with the Click-to-dial button, allowing click-to-dial functionality. Consequently, Salesforce recommends that you do not use a custom phone field for fax numbers. |
| Picklist | Allows users to select a single value from a list that you define. Not available for external objects. |
| Picklist (Mulit-select) | Allows users to select more than one picklist value from a list that you define. These fields display each value separated by a semicolon. Not available for external objects. |
| Roll-Up Summary | Automatically displays the record count of related records or calculates the sum, minimum, or maximum value of related records. The records must be directly related to the selected record and on the detail side of a custom master-detail relationship with the object that contains the roll-up summary field. For example, a custom field called “Total Number of Guests” displays the number of guest custom object records in the Guests related list. Not available for external objects. |
| Text | Allows users to enter any combination of letters, numbers, or symbols. You can set a maximum length, up to 255 characters. |
| Text (Encrypted) | Allows users to enter any combination of letters, numbers, or symbols that are stored in encrypted form. You can set a maximum length of up to 175 characters. Encrypted fields are encrypted with 128-bit master keys and use the Advanced Encryption Standard (AES) algorithm. You can archive, delete, and import your master encryption key. To enable master encryption key management, contact Salesforce. Not available for external objects. |
| Text Area | Allows users to enter up to 255 characters that display on separate lines similar to a Description field. |
| Text Area (Long) | Allows users to enter up to 131,072 characters that display on separate lines similar to a Description field. You can set the length of this field type to a lower limit, if desired. Any length from 256 to 131,072 characters is allowed. The default is 32,768 characters. Note that every time you press Enter within a long text area field, a line break and a return character are added to the text. These two characters count toward the 131,072 character limit. This data type is not available for activities or products on opportunities. Only the first 254 characters in a rich text area or a long text area are displayed in a report. |
| Text Area (Rich) | With the use of a toolbar, users can format the field content and add images and hyperlinks. The toolbar allows the user to undo, redo, bold, italicize, underline, strike-out, add a hyperlink, upload or link to an image, modify alignment, add a numbered or non-numbered list, indent, and outdent. The maximum field size is 131,072 characters, inclusive of all the formatting and HTML tags. Only the first 254 characters in a rich text area or a long text area are displayed in a report. The maximum size for uploaded images is 1MB. Only gif, jpeg and png file types are supported. Not available for external objects. |
| URL | Allows users to enter up to 255 characters of any valid website address. When users click on the field, the URL will open in a separate browser window. Note that only the first 50 characters are displayed on the record detail pages. |
Wow! You can see that there are numerous possibilities when it comes to configuring Salesforce and capturing specific types of data.
Field Properties
In addition to the types of fields that can be created, most field types can have their own unique set of field properties. For example, a Picklist field can have up to 300 picklist values with each value being no more than 40 characters. Or, on a percentage field, you can indicate the number of decimal places which should be used when a percentage is entered.
These properties should be evaluated and leveraged to ensure that the data provided is useful and accurate. For example, if a unique alphanumeric ID needs to be captured in Salesforce and the ID is always 8 characters long, update the text field properties so that maximum number of characters is 8. This will prevent users from entering a string longer than the ID the field is intended to capture.
API Name
The API name of a field will default to the field name provided except spaces will be replaced with an underscore (_). So, a field by the name of VIN Number would have an API Name of VIN_Number__c.
Notice that there is a double underscore and the letter “c” at the end of the API Name. This appendix indicates that the field is a custom field. In addition to the “c” you’ll also see two additional field appendices: x and r. The x stands for “external” and the “r” indicates a reference field.
The full API name is critical when building formulas, validation rules and integrations.
Lookup vs Master-Detail
These two fields tend to be the most confusing for folks so let’s talk about them for a moment.
Both are relational fields and on the surface, do the same thing. They relate objects to one another. However, there are some fundamental differences between these two relationship field types which need to be considered as part of your solution design.
Master-Detail Relationships
- Child records must have a parent
- Record level security cascades from the parent to the child records
- Record deletion cascades from the parent to the child records (delete the parent, the child is also deleted)
- Roll-up summary fields can be created on the parent record
- Standard objects cannot be the detail object in the relationship
Lookup Relationships
- A parent isn’t needed, meaning the relationship is optional
- There is no impact to security. Security will be set independent of any related object
- Roll-up summary fields can not be created on lookup fields
Take a look at this great video by John Coppedge of CertifiedOnDemand.com for more details and examples.
Before creating a relationship field, it is important to understand how the objects you want to relate will be used.
Field Best Practices
There are several best practices to consider when creating or managing custom fields in Salesforce.
- When creating a field, try and keep the field label and the API name the same. If a field name needs to change, first validate that the field is not used in an integration. If it is not used in an integration, you can change the API name.
- The Description field is not required, but should always be filled in – especially when the field is being used for a specific purpose (like in an integration).
- Help Text will be displayed to users on the record. Fill this in for every field so that users have an idea of how to use that specific field. It helps with on-boarding and clarification.
- Even though there is a 500 field limit per object, PLEASE don’t create that number of fields. Every field that is created (even when not on the page layout) is available in reporting. Keeping unused fields on the object clutters other areas of Salesforce. Keep it clean and simple.
- When there is a request for a new field, be curious and ask questions. What is this field going to accomplish? Validating these things will ensure that there isn’t an existing field that could be used.
Hands-On Activity
Wow! We have covered a lot of information. Hopefully, you are feeling good and have learned something new. Now that we have all of this great insight into custom fields, let’s create custom fields in our dev orgs to complete our family management application.
If you are following along with Zero to Hero, then you know that last time we created some custom objects to track the details of our Automobiles and Repairs. Let’s create some custom fields to complete those objects. I’ve included the fields and field types to create on each object in the following tables. I’ll walk you through the process of creating a field, then you work on your own to create the remaining fields.
Repairs Object
The repairs object is going to be related to two other objects: Accounts and Automobile. The account object contains the repair facility information while the automobile object contains the details of your automobile.
I’ll use a lookup and master-detail relationship to make the associations. I’ve chosen to use the master-detail relationship between the repair and automobile because I want to create a roll-up summary for the cost of all repairs on the automobile record and if the automobile record is deleted, I want the child records (repairs) to also be deleted.
I’ll use the lookup relationship field to relate repairs and the repair shop together because I am not looking to make roll-up summary fields on the account record. You could, however, use a master-detail relationship here instead of a lookup creating a many-to-many relationship.
Let’s walk through the creation of a field on the Repair object.
- In Salesforce, click Setup | Create | Objects | Repairs
- In the Custom Fields & Relationships section, click New
- Choose the appropriate field type. We’ll create the first field Automobiles which is a master-detail relationship. Click the radial button next to Master-Detail Relationship and click Next.
- In the Related To picklist, choose the object that Repairs will be related to. In this case, it will be the Automobile. Choose Automobile from the picklist. Click Next.
- Confirm the field Label and ensure that the Field Name populates by clicking the Tab key on your keyboard.
- Enter a field Description and/or Help Text. Click Next.
- You are now on step 4 of the wizard which is where you’ll indicate who can see this field. Because this is a relationship field and master-detail relationships are required, everyone can see this field. Click Next.
- Step 5 allows you to add the field to a page layout. We only have one page layout which is checked by default. Click Next.
- This next step allows us to add an Automobiles related list to the Repairs object. Select the Repair Facility page layout if not already selected, and click Save.
Complete this process for the remaining fields in the table below. Note that the wizard will not present the same exact steps for each field type.
| Field Label | Data Type | Description |
|---|---|---|
| Automobile | Master-Detail | We’re creating a relationship between the Automobile and Repair record. Since I want to calculate the total cost of all repairs for the vehicle, I am going to use a master-detail which will enable roll-up summary fields. |
| Date of Repair | Date | When the repair happened. |
| Invoice Number | Text (25) | Provided by the repair facility on the receipt. |
| Maintenance Type | Picklist (Multi-Select) | Indicates the various types of repairs that could take place. If you don’t want to use a multi-select picklist, you could use a series of checkboxes for the repair types (as an option). When prompted for field values, include the following: Alignment Battery Replacement Belt Replacement Brake Flush Brake Replacement / Repair Crank Shaft Differential Fluid Fuel Lines Oil Change Other Power Steering Flush Recall Shocks & Struts Tire Repair Tire Replacement Tire Rotation Transmission Transmission Flush |
| Repair Description | Long Text Area (32,768) | Use this box to provide an expanded explanation of the repairs including various notes. |
| Mileage | Number (18,0) | Captures the mileage of the vehicle when it was serviced by the repair facility. |
| Repair Facility | Lookup (Account) | I want the repair to be related to a repair shop but I won’t be doing any roll-up summary fields on the Repair Facility so a lookup relationship will suffice. |
| Repair Price | Currency (16,2) | The (16,2) indicates the character count and decimal places. 16 total characters with 2 characters after the decimal. |
| Repairs Suggested | Checkbox | Indicates that the repair facility suggested repairs that were not completed. |
| Suggested Repairs | Long Text Area (32,768) | An explanation of what repairs were suggested. You could also use a multi-select picklist if desired. |
Now that the fields are created, we’ll modify the page layout so that it is easy to read and navigate.
- In Salesforce, click Setup | Create | Objects | Repairs
- In the Page Layouts section, click Edit to the right of the Repairs page layout.
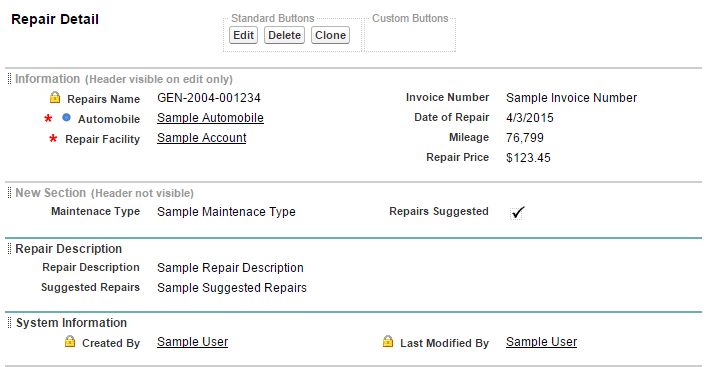
- Using the drag and drop editor, arrange the fields on the page so that it matches the below image.
- Ensure that the Automobile and Repair Facility fields are required. Do this by hovering over the field and clicking the wrench icon and then checking the box for Required.
- Once the page is arranged to match the above image (or the order you prefer), click Save at the top of the page.
Excellent! The Repairs object is now been completed!
Automobile Object
Using the same process you’ve just worked through on the Repairs object, create the following fields on the Automobile object and modify the related page layout.
| Field Label | Data Type | Description |
|---|---|---|
| Engine | Text (15) | Text is used here because it will include numbers and letters. 15 indicates the character length of the field. |
| License Plate Number | Text (8) | Text is used here because it will include numbers and letters. 8 indicates the character length of the field. |
| Lifetime Repair Costs | Roll-Up Summary (SUM Repair) | The roll-up summary field will calculate the sum of the related repair records. |
| Model Year | Number | There will be no letters in this field so a number field will work best. |
| Purchase Date | Date | Date is used over a date/time field as the time is not important for this particular record.Date is used over a date/time field as the time is not important for this particular record. |
| VIN Number | Text (25) | VIN numbers combine letters and numbers so a text field must be used. 25 indicates the character count. |
Great job! You’ve completed the setup of the Automobile object.
Test What You’ve Done
Now that we have the objects and fields created, let’s test what we’ve done and make sure that everything works! First, if you keep your repair receipts, grab one from wherever you keep them and let’s use it to fill in our new records.
- First, let’s create a vehicle record. Navigate to the Automobile tab and click New to create a new record.
- Populate the record with all of the vehicle details. You only really need to do this once so take a moment to find the data for your car.
- Now that the auto record is created, let’s create a repair facility record. Navigate to the tab ribbon at the top of the page and click Accounts.
- Create a repair facility record to include the name, address or phone number from an actual repair invoice. Save the repair record.
- From the Repair Facility record you’ve just created, scroll to the related list section and click New Repair from the Repairs related list.
- Enter the data from your repair receipt. Relate the repair to your newly created Repair Facility and Automobile records.
Awesome! Did it work? Were you able to create the records without any issues? What do you want to change or modify? Feel free to make those changes and test it again!
Resources & Additional Reading
A few weeks ago an Admin Hero reader asked if I could include a section at the end of the Zero to Hero posts with additional information and resources on the topic. I thought it was a great idea, so here are some resources that I think will be helpful to you as you learn about fields and page layouts.
- Object Relationships Overview (Help & Training)
- Considerations for Relationships (Help & Training)
- Creating New Fields in Salesforce (Help & Training)
- Getting Started Using Image Formula Fields (Shell Black)
- Fields & Page Layouts (Shell Black)
- Using Zones When Designing Page Layouts (Shell Black)
How did you do? Are you confused or unable to fully grasp a concept in this post? Leave a comment below and I’ll do my best to provide additional details!

Hey Brent, in your zero to hero post about creating the fields on the Repairs object (step 4), you indicate to use Account for the master-detail relationship. Shouldn’t it be using Automobile instead, since repairs is the child of automobile (not account)?
LikeLike
Hello Deb! Thanks for pointing this out. I’ve updated the post to read correctly!
LikeLike
I did something wrong. I never saw the option to select repair facility in the page layout on step 9.
“This next step allows us to add a related list to the related object. Select the Repair Facility page layout and click Save.”
LikeLike
Hi Mark! Step 6 is the last step in the creation process for Lookup and Master-Detail fields and will default to adding the related list on the related object. More than likely, if you navigate back to the Automobile object and look at a record, you’ll see a related list for Repairs. If not, edit the page layout for Automobiles and add the Repairs related list.
LikeLike
Hi Brent,
Many thanks for this, this is amazing and I am already enjoying it.
One thing on the repairs page layout you have got mileage.
The field has not been declared for Repairs.
Also it appears to be an attribute of Automobiles, I created one but I still can’t get it in the repairs layout (cuz it doesn’t belong to the object).
Is there a way to get fields from Master objects (Automobile has been defined the master of records)?
LikeLike
Great catch Abhi! I’ll add Mileage as a field to the exercise. There isn’t a way to transfer a field from one object to another. You’ll need to create the field on the object directly. You can create another field called Mileage on the Automobile object if you like. I would probably call it something like “Miles at Purchase” which would show how many miles were on it when you purchased it.
LikeLike
Thanks again Brent! This 1 was super!! Yahoo! It all worked…just like you said it would!
OK, question: Under Field Best Practices, the 1st 2 bullets reference “integration”…did I miss it? I don’t recall reading about integration yet. I can guess, but certainly don’t know what it’s referring to here. Thanks for the hand-holding, Lisa
LikeLike
Hi Lisa! No, you didn’t miss anything. I am just referring to the general use of the description field. We haven’t covered integrations at all.
LikeLike
Thanks Brent! You’re super taking time to answer all of these comments! I’m still enjoying learning w/your guidance & look fwd to more modules! Lisa
LikeLike
Hi,
Thanks for your informative post.
Could you please explain how recordtype, page layout, object are related with each other. In addition, could you please tell me whether the list given under Build–>Customize are different record types i.e. Activities, Leads, Campaign, Accounts etc.
LikeLike
Hello Amol. You may want to check out the rest of the Zero to Hero series. I cover objects, page layouts, and record types in a few posts. That may help! https://adminhero.com/zero-hero/
LikeLike
Hi Brent,
Thank you for guidance.
However, I am still unable to create a repair facility record, particularly stuck on step 3. While trying to create a ‘Repair record’, I can’t enter the Repair facility name. Please advise.
LikeLike
Hi Chaithra! I assume you’ve created the Repair Facility object first? The object must first be created and have a link to the Automobile object. Provide a screenshot if you are still having trouble and I’ll take a look!
LikeLike
Hi Brent,
I cannot find the Repair Facility in the page layout on step 9 for Repairs Object. I remember Repair Facility page layout was created for Account Object.
‘This next step allows us to add a related list to the related object. Select the Repair Facility page layout and click Save’
Help!
LikeLike
Hi Roopa! If you’re using a Master-Detail relationship here, you shouldn’t need to do anything in particular as the setting defaults and read-only. Essentially, all we’re doing in this step is determining where the new related list will live. I’ve updated the language in the post to be a bit clearer – hopefully, that helps. If you’re still having trouble, email me at brent@adminhero.com with a screenshot and I can provide you more clear instructions!
LikeLike
Hi, I am trying to create lookup relationship with Repair Facility but it is not showing up in the drop down list.
LikeLike
Hi Brent,
I have a custom object A and another object B. Object B has a lookup to object A and shows in the related list of object A.
In object B showing as a related list on object A’s detail page if you click NEW it pops up a screen where the key field of object A is also displayed. I want to make this field either read-only or make it disappear from the NEW page layout.
Currently the object A key field is a lookup to object A and you can choose any object A record and we do not want that. This object B new record should only be associated to the object A record that it is created from.
I can’t take this field off the page since it is required and I can’t make it Read-Only. I am sure there is a solution.
Thanks
LikeLike
Shahid, I *think* I’m following your logic but if this answer doesn’t make sense, let me know. Perhaps I missed something!
You cannot remove the Object A lookup field from Object B. It must reside on the page (specifically, if it’s a Master-Detail relationship). You could potentially do some unsupported hacks to get around this, but I wouldn’t recommend it. If you don’t want the second lookup to Object A on the record, you should be able to delete it off of the page or delete the field entirely.
LikeLike
How would you test the total cost of all repairs, to see if the master-detail relationship was set up correctly?
thanks for your help.
LikeLike
Hi Brent,
i’m stuck in step 4
i’m not sure what to do
“Create a repair facility record to include the name, address or phone number from an actual repair invoice. Save the repair record.”
did you mean create a new account record?
or create a repair facility record? if so from where should i create it?
thanks!
LikeLike
Hey Tom, yes! Repair Facilities are setup as an Account so you’ll create a new Account in this instance and provide the Repair Facility name and contact information. For example, Big O Tires, 1234 Main Street.
LikeLike
Hi, I am trying to create lookup relationship with Repair Facility but it is not showing up in the drop down list.
LikeLike
Hey Tom! Be sure that you’re on the Repair Detail object in Salesforce when creating these fields. I’ve created a Master-Detail relationship on the Repair Detail object. Repair Facility is a type of Account so your lookup or Master-Detail will be linking to the Account object.
LikeLike
Hi, I am on the Repair object. Ive created master detail relationship with Automobile. Tried to create lookup relationship with Repair Facility but in the dropdown list only Repair is showing no Repair Facility.
LikeLike
Hi tom
iam unable to perform the test on objects and fields and my query where we need to crate record??
and how to select the related lists iam unable to figure it out…
please help!!!!!
LikeLike
hi tom please explain from step 2 in test yourself!!!!
LikeLike
Hi Brent,
Thanks for wonderful post, I have one question how we can customize year in date picker. In our case Purchase date.
I want it to be start from 1990.
LikeLike
I don’t know of a way to customize the start date of the date picker, but you can key in the date in the format of mm/dd/yyyy using the keyboard and it will accept the value.
LikeLike
HI Brent,
Thanks so much for putting this site together! I was going through the exercise and when I got to step 3 to create an account for a repair facility, I clicked on the Account tab and clicked new but did not see a Record Type for Repair Facility. I am certain I must have missed a step or messed up when doing something under the Account object. Sorry I am new to SF, and got my SF Admin cert in Mar 2017 but havent touched the environment since :/.
LikeLike
Hey Colleen – make sure the record type is awarded to your profile in Salesforce. As long as it exists, you should be able to assign it to various profiles and it will show up when you click “New” to create the new record. However, if you only have one record type on the Account, you won’t get the record type selection splash screen. That could also be a possibility.
LikeLike
Hi,
Thank you for this post. In Auto object under Model year, wouldn’t it be easier to have the Model Year be a text instead of a number? You get a comma in the year when you put it as a number.
LikeLike
Yeah, a text field would work just as well in this case and would eliminate the auto comma that Salesforce adds to number fields. A validation rule could be used to enforce that only numbers are entered into the text field if that was a concern.
LikeLike
Hello Brent,
First of all, great job on this putting this content together. It is very straight forward and easily comprehensible. I liked how you said about having pre-requisites about doing this Salesforce training.
I have a question for you. I am on this page https://www.adminhero.com/a-primer-on-salesforce-fields-and-relationships/ for 2 days now but cannot proceed further because I am not able to add the Repair Facility on my developer org.
“”9. This next step allows us to add an Automobiles related list to the Repairs object. Select the Repair Facility page layout if not already selected, and click Save.””
Please help.
Thank you,
Yash
LikeLike
can you please help regarding automobile field
in repair page layout in automobile field i am getting sample text instead if sample account
same problem with Repair Facility instead of Sample Account i am getting Sample text
LikeLike
Is the field in the page layout editor saying “Sample Text” where you would expect to see the Account Name? This isn’t unusual. What do you see when you’re viewing the record? You should be able to see the linked Account without sample text.
LikeLike
Please update the content on your page as the UI of the salesforce has been changed, I am finding it difficult to navigate.
LikeLike
Hi, Sudhir! While the content is several years old, it’s still accurate and the screenshots in this particular post are still accurate as well. Is there a particular piece of the post or on another post that you’re having trouble with?
LikeLike