PREFACE: This post is part of the Zero to Hero series.
Our last two Zero to Hero posts have focused on the basics of the Salesforce architecture. Now that you have gotten through that dry and boring stuff, we’re going to start the next Chapter of the series by looking at the User Interface.
Before we get started, make sure that you have a free developer org setup. We will now be getting into the application, and it may be helpful for you to follow along or play with the functionality from this point forward.
To start, let’s define User Interface (abbreviated UI) to ensure that we are all on the same page. Here’s a definition that I like from webopedia:
The user interface is the junction between a user and a computer program. An interface is a set of commands or menus through which a user communicates with a program.
Essentially, the user interface allows us humans to communicate with machines. When you’re on your phone or computer, the software you interact with is the user interface. Every website, including this one, has a user interface.
Accessing Salesforce
Salesforce is a SaaS application. That stands for Software as a Service. SaaS applications are delivered through the internet (otherwise called The Cloud). There are several ways to access Salesforce, but we are going to be focusing on the desktop version.
To login to your developer account (or any production account), navigate to login.salesforce.com and enter your credentials. You are now logged in!
Salesforce Navigation Basics
Because we access Salesforce through a web browser, you’ll notice that all of the basic web functions you know already will apply to Salesforce. For example, users can use the back arrow to navigate to a previous record. Keyboard shortcuts (like my favorite Ctrl+F) can be used as well.

In the above screenshot of an account record, you will see that the page is made up of several components: tabs, hyperlinks and form fields. Let’s break each one of these down quickly.
If any of the content definitions below are confusing, just navigate back to the first post: Understanding Salesforce as a Database. We cover some of the basic terminologies there.
Tabs
Tabs are quick links to objects in Salesforce. Tabs are persistent across all pages with a few exceptions including Reports & Dashboards. The tabs that display at the top of the page can be modified by the individual user to accommodate the way they work. They can also be modified by you, the Administrator, which impacts all users.
Clicking on a tab name will redirect you to a landing page which includes several actions. For example, if you click on Accounts, you will then be presented with an option to create a new account.
Hyperlinks
Just like any website, Salesforce contains hyperlinks. These links can be used to navigate through Salesforce in a variety of ways. Notice that in the screenshot below, my name displays as a hyperlink. Remember when we talked about relational databases in the first Zero to Hero post? This is what a relational database looks like.
By clicking on the owner’s name, you will be redirected to the owner’s profile. Clicking on any other hyperlink on the page will redirect the user to a new related page or allow them to perform a specific action.
Form Fields
Form fields allow users to enter data into a record. In the above screenshot, the account name and all contact information, including the address, are form fields. We won’t get into the specific field types in today’s post, but several types of fields can be created to capture all sorts of data.
Great! Now that we have that covered let’s look at how to navigate Setup.
Setup: The Admin’s Home Base
As an Administrator, most of your time will be spent behind the scenes in Setup. Setup allows you to manage the entire Salesforce org.
By clicking Setup at the top of the page, we are redirected to this restricted area of Salesforce. It’s important to note that System Administrators are typically the only users to have access to Setup by default. However, users can be awarded access to the Setup menu to complete specific tasks or functions.
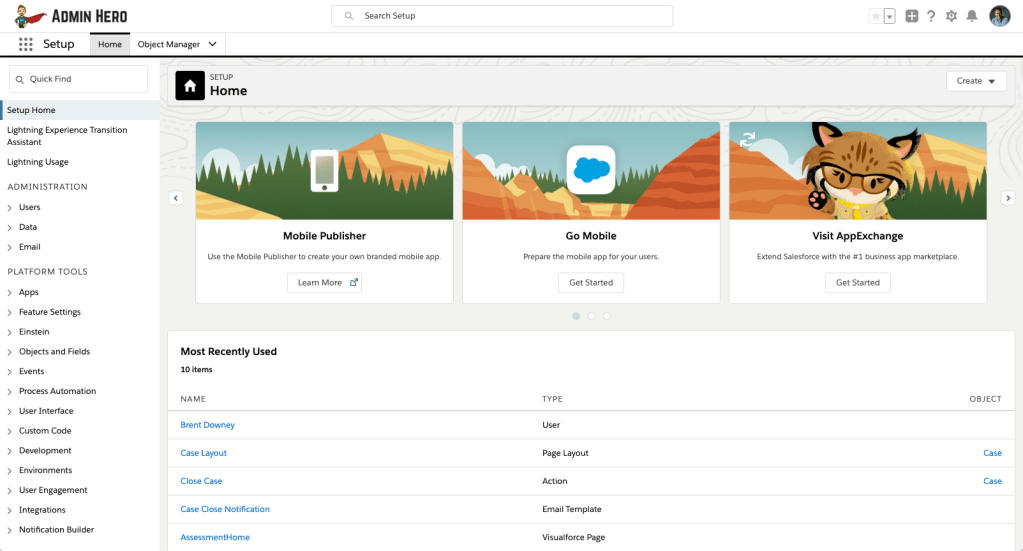
Accessing the Setup menu for the first time can seem overwhelming. There is a lot of information here, and it can be difficult to know what to do or where to navigate. To start, I want to break down a few of the sections in the middle of the page.
The Center Carousel
The top Carousel in Lightning Experience has a series of links that will provide you with additional resources. With multiple pages to scroll through, you may find links to release notes and the AppExchange, or quick links to org setup settings.
Take a quick scroll through the carousel on occasion to see what’s new!
Setup Menu
The setup menu is broken up into three distinct sections: Administer, Build, and Deploy. You’ll live in these three primary sections the majority of your time.
Administration
The Administration section contains permissions related to Salesforce access. This includes user management, desktop integration (like Lightning Sync), email templates and organization-wide system preferences.
Platform Tools
Platform Tools contains the system toolsets you’ll need to extend functionality in the org including creating process automation with Process Builder and Workflow, customizing the global user interface settings, managing global actions, and managing deployments.
Settings
Settings provide Admins the ability to manage network security access, pull system reports like the Setup Audit Trail and Data Exports, set login access policies and manage company settings (including holidays and business hours).
Within each of these sections, you can click on any of the sub-section headers and a tree of options will open up. As you work more with the Setup menu building and modifying the system, you’ll become familiar with where everything lives and navigating will become very quick and very easy.
However, to help new users find what they are looking for, Salesforce has a new Setup Search option. This search box allows you to enter a keyword and find areas within Setup that match that result.
So, Let’s say that you need to create a workflow rule but you don’t know where to go. In the Setup Search box, you can type in the word Workflow and the left-hand menu options will dynamically filter to reveal matching results.
This field can also be used to search for matching custom fields, custom objects, users and other setup items. It makes it fast to find what you’re looking for. I remember when this search didn’t exist, and I had to memorize the location of all of the settings within Setup!
Congratulations on completing this module of Zero to Hero! You are one step closer to becoming an Admin Hero. Next time, we will get our feet wet with a hands-on lesson! I hope you’re excited!
If Zero to Hero, or any post on Admin Hero has helped you, please share it!

Very well written and crisp information on Salesforce basic.
LikeLike
Thanks for the kind words!
LikeLike
Waiting eagerly for the remaining chapters. Please publish those fast 🙂
LikeLike
Thanks for sharing your knowledge and experience to help others improve their skills!
LikeLike
Thanks for reading Tim. I love the Salesforce Community and am happy to share my personal experience with community members!
LikeLike
typo in the 2nd paragraph, 2nd sentence…. “not” should be “now”
LikeLike
Thank you George. I’ve updated the post. I appreciate the feedback!
LikeLike
Thanks for creating all this fantastic content to help me move from the user to understanding the admin side. Just wanted to let you know in Chrome the pictures in this post are not appearing – after several refreshes. Thanks.
LikeLike
Thanks for reading! I’m not sure about Chrome – everything is working well on my end. Perhaps try in another browser or an Incognito mode to see if it’s cookies or something similar. Thanks again!
LikeLike
Excellent!
LikeLike
Thank you so much for writing this blog and teaching us newbies! Your teaching style is completely suitable for an absolute beginner like me -so many other places start out too complicated. I will forever be grateful for your generosity!
By the way, I’m not sure if it’s a typo or not, but the part under “administer,” in the “Setup Menu” section, did you mean “…organization system wide preferences” instead of “…organization wide system preferences?” Just trying to be helpful, since you’ve been so helpful to me…thanks again!
LikeLike
Thanks for that positive feedback Usagi! I actually haven’t put this post through my new proofreading tool yet, so I not only fixed that item, but a few others as well! Thanks for your comment!
LikeLike
I’m just diving into Salesforce. Would it be better for me to learn in Lightening view or Classic? Is Lightening where it’s heading for the future?
LikeLike
Really helpful to understand the basics….
LikeLike
I have found this extremely helpful. Thank you
LikeLike
Thanks Brent for your tutorial.it’s really helpful.
If “Next” button was there it will be easy to travel through posts, instead of going to home page and open a specific topic.It’s just my opinion.
LikeLike
Hi Brent,
First, thank you for this blog. This is some serious time and dedication.
I have recently started training in SF. My company uses it, and I think I may try some freelancing.
I have a question. When I sign into my SF sandbox company, it brings me to a “Sales” homepage with several widgets already built but empty. When I click the “Setup” gear icon in the top ribbon, it takes me to a Setup page that is much different than the one shown in your screenshots. I do not have Quick Links or Community in my Center Stack. I also don’t have Administer, Build, or Deploy. I have a left scroll bar with things such as Administration, Platform Tools, and Settings. My page has 6 Get Started boxes for some SF apps, and below that is My Recently Used box. That’s it.
Sorry for the long email, but can you help me with what I’m doing wrong?
LikeLike
Brent,
Please disregard. It is set to default to the Lightning Experience. I changed my view to SF Classic, under Profile, and it changed to the view you have.
LikeLike
Glad you got it figured out! Thanks for reading Admin Hero!
LikeLike