The Hidden Functionality of Custom Report Types

Custom report types in Salesforce are great. They let you build an array of relationships to see data in a variety of complex ways. But they also hold some secrets that most admins don't know about.
It wasn't until I took the Advanced Administrator certification class that I learned the secret functionality of custom report types. With just a few extra keystrokes, administrators can make these reports far more user-friendly.
Let's take a look!
Set Default Fields
When selecting a standard report type, Salesforce will populate the report with a few default fields. This makes the report building process much easier.
Custom report types don't default any data adding several extra steps for users. But, you can add some immediate value to the report by defaulting fields to the report type - giving users an immediate report template to build off of.
Here's how to do it!
- Access the report type by clicking Setup | Create | Report Types | Report Type Name.
- Click Edit Layout in the Fields Available for Reports section.
- Fields with a checkbox in front of the label are already defaulted. To add a field to the default layout, double-click the field name.
- In the window that opens, check the box titled Checked by Default.
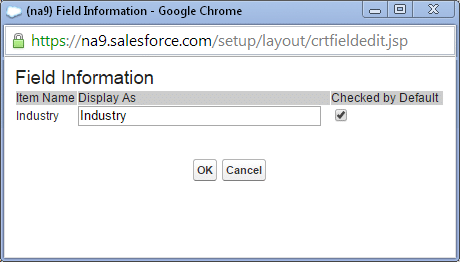
Notice that in this new window that opened, the field label can also be changed in the Display As section. The change made here doesn't reflect on the Salesforce record - it just updates the name in the report builder and the output report.
This is an excellent way to add clarification to a particular field if there tends to be user confusion or wholly rename everything. I think there is an April Fool's day joke in there somewhere!
Conversely, to remove a field from being a default value on the report, uncheck the Checked by Default box.
Hide Specific Fields from Reports
Custom report types also allow us to determine which fields can be reported on.
Have old fields that you don't want users to be able to pull into a report? Perhaps you just wish to reduce the number of fields available to report on to help streamline the report creation process. It can be done!
While fields can be removed, it is important to note that sometimes, fields also need to be added to the report type. Specifically, when adding new fields to an object, the new field doesn't always show up in the report because it hasn't been added to the report type.
If this seems janky to you, it is. Vote for this idea to have new fields automatically added to report types.
Alright, let's look at how to hide or show fields on the custom report type. Follow steps 1 and 2 above to access the report type.
First of all, notice that on the right side of the page, there is a box that shows fields for each object in the report type. In the View section, choose the object to review.
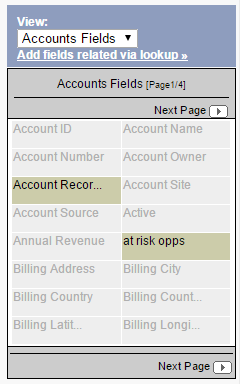
Fields that are available on the report are shaded gray. The fields with the green/brown color are hidden from the report type. This means that users will be unable to report on the data in these fields.
When a new field is added to your object, it tends to end up here - inaccessible to the report.
To add this field to the report type, simply drag it into the appropriate section.
Add Fields via Lookup
Not only can you add or remove fields related to the objects in the report type, but additional fields from related objects can be added to the report as well.
In the report type that I have been working with, Accounts and Contacts are the two primary objects. But let's say that I want to pull in more specific information on a related object (where a lookup field is used) such as owner email address. We can do that!
In the above screenshot, you'll notice a hyperlink under the object picklist which says Add fields related via lookup. When clicking on this, all objects related to the selected object will display. In this example, I am looking at Account Fields. When I click the link, this is what I see:

By clicking into any one of the options, I'm presented with and add any number of additional fields. Clicking on Account Owner, I can select any number of fields related to the owner including email address.
These additional fields are useful for adding additional context to the data but also for slicing and dicing the data multiple ways using filters.
Change Field Section Folder Names
Salesforce's report builder does a decent job of grouping fields in the field panel, but certain fields make sense in a different folder section. There may even be a need to create a whole new custom folder section.
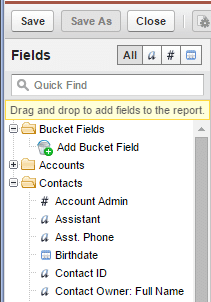
In the above image, we can see that there are two folders in the field panel of the report - Accounts and Contacts. These folders match the sections visible in the custom report type editor (where we were adding, removing and defaulting fields above).
Let's say that we want to create a new section and organize the fields totally different than what Salesforce provides.
Following steps 1 and 2 above to access the custom report type, the click Create New Section. Once the section is created, drag and drop any fields from other sections to this new section.
To edit the labels of existing sections, click Edit in the red header to rename.
Hide Unused Report Types
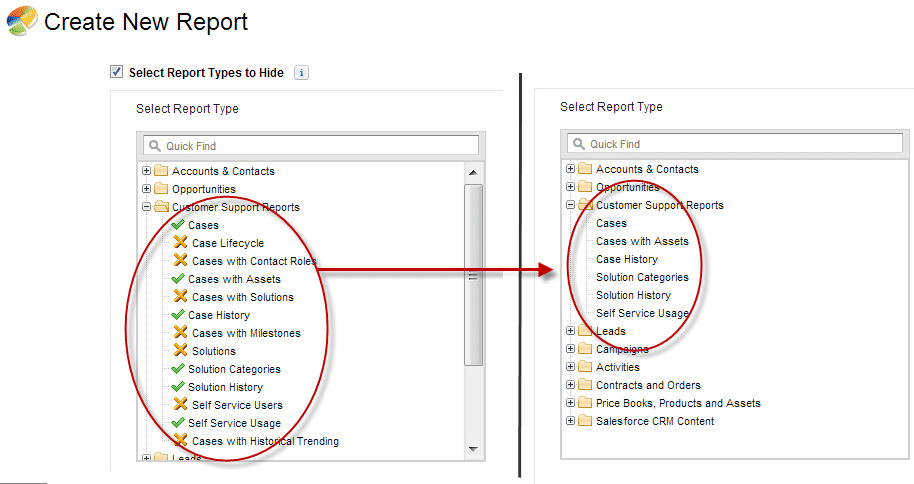
In the Spring '14 release, Salesforce gave us the ability to hide unused report types. With so many default report types provided, hiding unused report types can increase adoption of reports, reduce confusion for users and streamline the process of choosing a type of report to build.
To hide specific report types:
- Click Reports | New Report...
- Check the box titled Select Report Types to Hide
- Click the check mark to change it to an X and hide the report type
With these hidden functionality gems, reporting will become more productive and provide users with a lower barrier to entry when it comes to creating their own reports. We all want self-sufficient users and simplification is one of the key components to users helping themselves.
Consider adding the report type clean-up to your list of items to audit so that they are regularly cleaned and updated and unused report types are removed from view or deleted.
What other setting or tips and tricks did I miss when it comes to report types? Let me know - leave a comment!